Snickers discovered jerky at a friend’s house. She had one of those fancy dehydrators on the counter and was making chicken jerky strips for her golden retriever. She tossed Snickers a piece. He caught it midair, which he never does, chewed it for about three seconds, and then stood perfectly still staring at her hand like a statue waiting for the next one.
I wanted to make it at home, but I didn’t have a dehydrator and I wasn’t about to buy one for dog treats. So I started with what I had.
An oven, a baking sheet, and some ground turkey that was on sale for $2.49 a pound. Ground turkey jerky is different from the strip jerky you’d make with chicken breast or beef. You shape it yourself, which means you control the size, the thickness, and the texture. Thin and crispy for small dogs. Thicker and chewier for bigger ones.
I’ve been making it two ways ever since. The oven method for when I want it done in a couple hours. The dehydrator method for when I eventually bought a cheap one and wanted that perfect, leathery chew that lasts longer. Both produce great jerky.
The oven version is crispier. The dehydrator version is chewier. Snickers doesn’t have a preference. He inhales both.
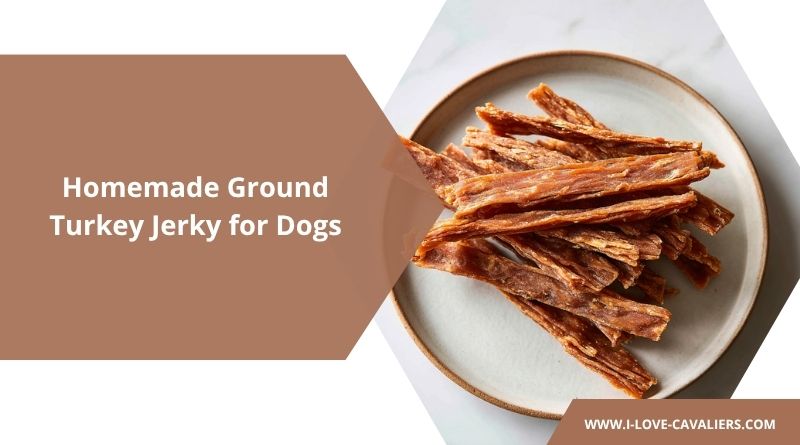
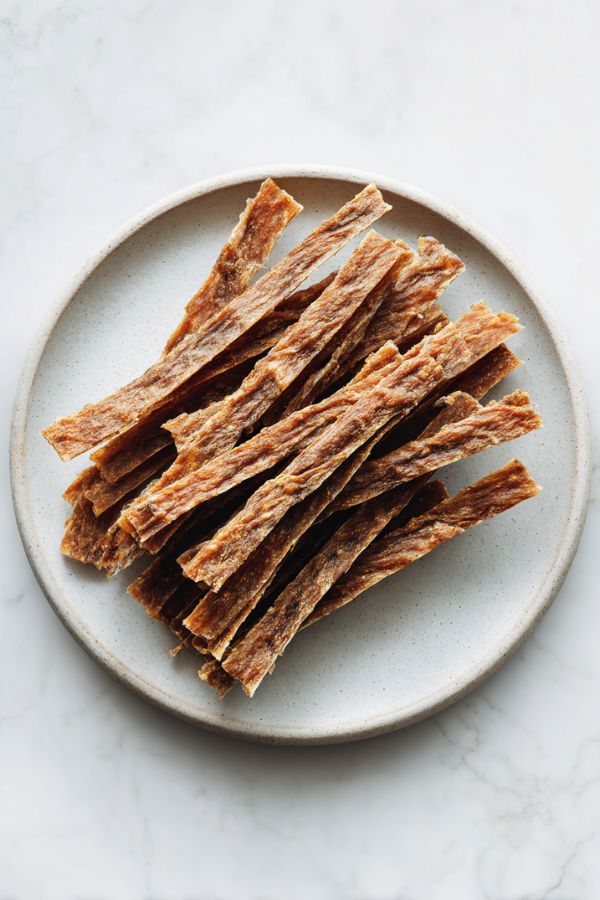
Ground Turkey Jerky Recipe for Dogs
Here’s everything you’ll need to make these delicious dog treats.
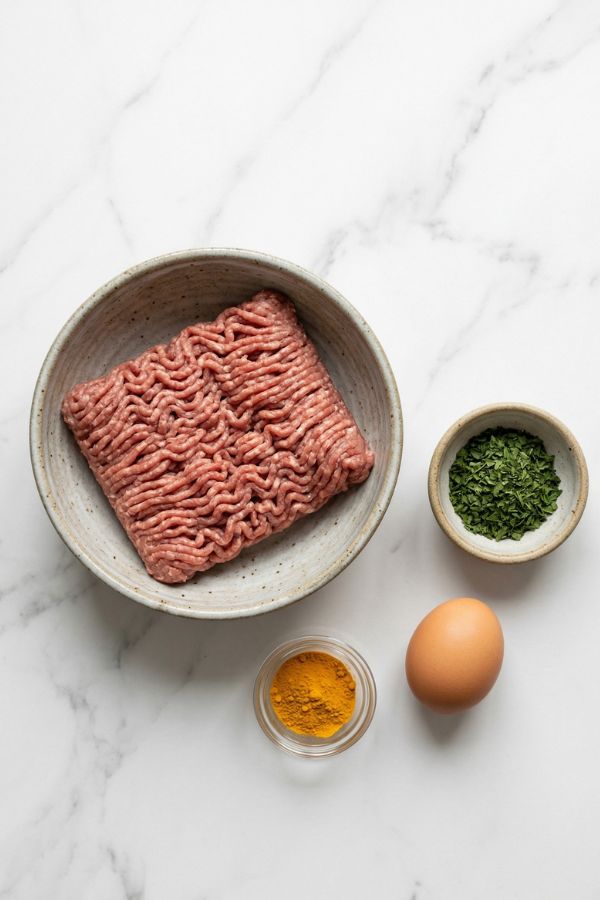
Ingredients (Same for Both Methods)
Both preparation methods use the same base recipe. The only difference is how you dry them.
| Ingredient | Amount | Approx. Cost |
|---|---|---|
| Ground turkey (93/7 or leaner) | 1 lb | $2.80 |
| Egg | 1 large | $0.35 |
| Dried parsley | 1 teaspoon | $0.05 |
| Turmeric powder (optional) | 1/4 teaspoon | $0.03 |
| Total | ~$3.23 |
That’s it. Four ingredients. No salt, no garlic, no onion powder, no soy sauce. Traditional jerky marinades for humans use ingredients that are toxic or way too high in sodium for dogs. This recipe gets its flavor from the turkey itself, and trust me, your dog doesn’t need teriyaki sauce to be excited about this.
Use 93/7 or leaner ground turkey. Fattier grinds (like 85/15) release grease during drying and the jerky ends up oily instead of crisp. If 93/7 is all you can find, pat the formed strips with a paper towel before drying to absorb some surface fat.
Method 1: Oven-Dried (No Special Equipment)
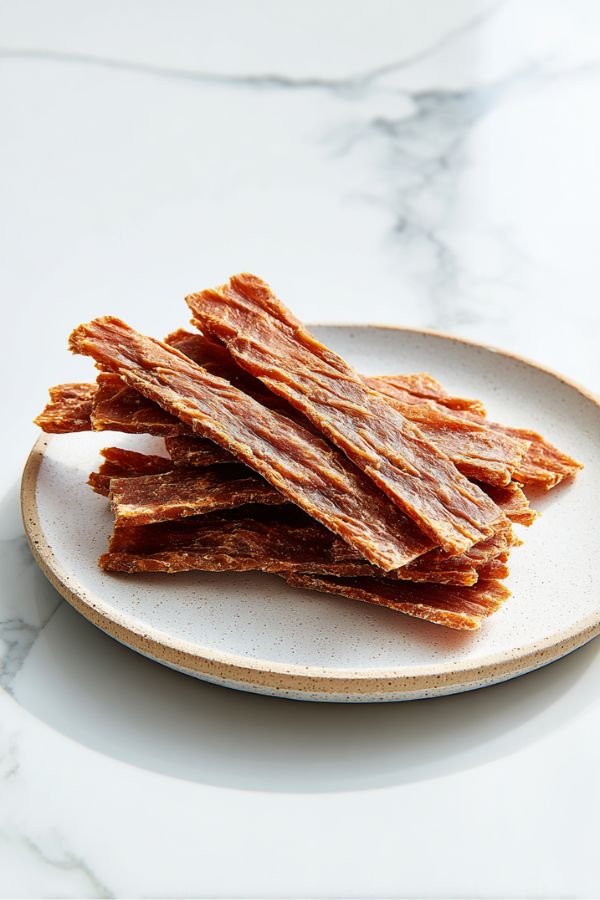
This is how I started and it’s still how I make jerky most of the time. No dehydrator, no gadgets. Just your oven set low and a couple of hours of patience. The result is a crispier, more cracker-like jerky that snaps when you bend it. Smaller dogs tend to prefer this texture because it breaks into smaller pieces easily.
Step 1: Preheat and Prep
Set your oven to 200 degrees F (93 C). If your oven doesn’t go that low, use the lowest setting it has and check the jerky 20 minutes earlier than the times below. Line a large baking sheet with parchment paper.
Low and slow is the whole point. You’re drying the meat, not cooking it fast. High heat cooks the outside while leaving moisture trapped inside, which gives you a rubbery texture that goes bad quickly.
Step 2: Mix the Meat
In a medium bowl, combine the ground turkey, egg, dried parsley, and turmeric. Mix with your hands or a fork until the egg is evenly distributed through the meat. Don’t overmix or knead it like bread dough. Just combine until everything looks uniform. Thirty seconds of mixing is plenty.
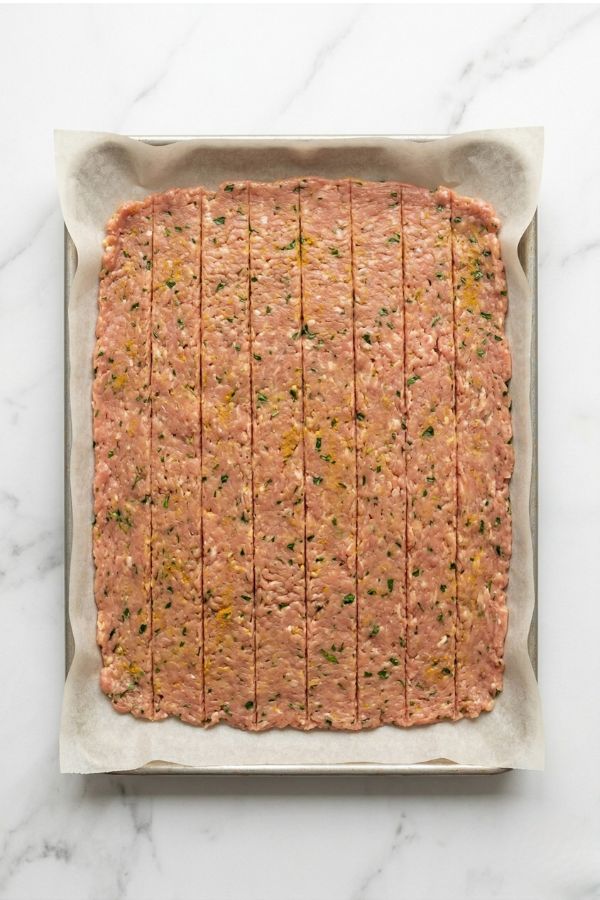
Step 3: Spread the Meat Flat
Place the meat mixture on the parchment-lined baking sheet. Lay another piece of parchment on top. Use a rolling pin to press the meat into a flat, even rectangle, about 1/8 to 1/4 inch thick. Thinner jerky dries faster and comes out crispier. Thicker jerky stays chewier.
The second piece of parchment on top keeps the rolling pin clean and gives you a smoother, more even surface. Peel it off after rolling.
Take the time to get the thickness even across the whole sheet. The edges will dry faster than the center no matter what, but an even spread minimizes the gap. I made my first batch with one end twice as thick as the other and ended up with burnt edges and raw middle. Don’t repeat my mistake.
Step 4: Score Into Strips
Using a knife or pizza cutter, score the flattened meat into strips about 1 inch wide and 3 to 4 inches long. Don’t cut all the way through. Just press deep enough to mark the lines. The strips will break apart easily along the score marks after drying. For small dogs, score them into smaller squares instead.
Step 5: Bake Low and Slow
Place the baking sheet in the oven. Bake at 200 F for 2 to 2.5 hours. At the one-hour mark, open the oven and blot the surface with a paper towel to remove any rendered fat or moisture. This helps the jerky dry evenly.
At 2 hours, check a piece from the center (not the edge, those dry faster). It should feel firm and dry to the touch, not tacky or spongy. If it still feels moist, give it another 20 to 30 minutes.
Prop the oven door open about an inch with a wooden spoon during the last 30 minutes. This lets moisture escape faster and gives you a drier finish. My oven runs a little hot, so I do this for the whole bake. You’ll figure out your oven’s personality after one batch.
Step 6: Cool and Break Apart
Let the baked sheet cool completely on the counter, at least 30 minutes. The jerky will firm up significantly as it cools. Once it’s at room temperature, snap the strips apart along the score lines. They should break cleanly with a satisfying crack. If they bend instead of breaking, pop the sheet back in at 200 F for another 15 minutes.
Storage (Oven Method)
Airtight container or ziplock bag at room temperature for up to 1 week. Fridge for up to 3 weeks. Freezer for up to 4 months. This batch makes roughly 30 to 40 strips depending on how you sized them. I keep a week’s worth in a jar on the counter and freeze the rest in a labeled bag.
Oven-dried jerky has a little more residual moisture than dehydrator jerky, so it doesn’t last quite as long at room temperature. If you live somewhere humid, fridge storage is the safer bet.
Method 2: Dehydrator (Chewier, Longer Shelf Life)
I bought a cheap dehydrator for $35 about four months after I started making jerky in the oven. Not because the oven wasn’t working, but because I wanted that tougher, bendable, leathery chew that takes longer for dogs to work through. Dehydrator jerky is what you get at the pet store, that dense, chewy texture that keeps a dog busy for a few minutes instead of a few seconds.
If you don’t have a dehydrator, the oven method above is just as good. This is a “nice to have,” not a requirement.
Step 1: Mix the Meat
Same as the oven method. Combine the ground turkey, egg, parsley, and turmeric in a bowl. Mix until uniform. Nothing changes here.
Step 2: Form the Strips
This is where the dehydrator method differs. Instead of pressing the meat into one flat sheet, you’re forming individual strips by hand. Take a golf ball-sized portion of the mixture and roll it into a log shape. Press it flat between your palms or on a cutting board until it’s about 1/4 inch thick, 1 inch wide, and 4 inches long. Repeat until you’ve used all the meat.
Keep a small bowl of water nearby and wet your hands between strips. The meat is sticky and the water keeps it from clinging to your fingers. I learned this the messy way.
Alternatively, you can use the rolling pin method from the oven steps, press the whole batch flat on parchment, score into strips, and then peel them apart before placing on the dehydrator trays. This is faster if you’re doing a big batch.
Step 3: Load the Dehydrator Trays
Place the strips on the dehydrator trays in a single layer with space between each strip. Air needs to circulate around all sides for even drying. Don’t let the strips touch each other. Most standard dehydrators can fit 20 to 25 strips per tray across 4 to 5 trays, so one pound of turkey uses about 2 trays.
Step 4: Set Temperature and Time
Set the dehydrator to 155 degrees F (68 C). This is the standard temperature for meat jerky and it’s high enough to kill bacteria while low enough to dry instead of cook.
Dehydrate for 5 to 7 hours. The time range is wide because every dehydrator is different. Cheaper models take closer to 7 hours. Nicer ones with stronger fans might be done in 5. Start checking at 4.5 hours.
Rotate the trays every 2 hours if your dehydrator heats from the bottom. The bottom trays dry faster, so swapping positions keeps everything even. If yours has a fan that circulates air evenly, you can skip this step.
Step 5: Check for Doneness
Pull a strip from the center of a middle tray. Bend it. It should bend without snapping but feel dry and firm, not soft or mushy. When you tear it in half, the inside should be uniformly dry with no wet or pink spots. If you see moisture in the center, give the batch another hour.
The texture you’re going for is like a fruit leather made of meat. Pliable, dense, dry. Not hard and crunchy like the oven version. Different texture, same great treat.
Step 6: Cool Completely
Remove the trays and let the strips cool at room temperature for 20 to 30 minutes. They’ll firm up slightly as they cool. Don’t stack them on top of each other while warm or they’ll stick together.
Storage (Dehydrator Method)
Airtight container or ziplock bag at room temperature for up to 2 to 3 weeks. Fridge for up to 5 weeks. Freezer for up to 6 months. Dehydrator jerky lasts significantly longer than oven jerky because it removes more moisture. This batch makes roughly 25 to 35 strips depending on size. The yield is slightly lower than the oven method because the strips shrink more during the longer drying time.
Serving Guidelines
Turkey jerky is a treat, not a meal. Keep it to no more than 10% of your dog’s daily calories.
| Dog Weight | Strips Per Day | Notes |
|---|---|---|
| Under 10 lbs | 1 small strip | Break in half if needed |
| 10-20 lbs | 1-2 strips | Snickers’ range |
| 20-40 lbs | 2-3 strips | |
| 40-60 lbs | 3-4 strips | |
| 60+ lbs | 4-5 strips |
These are guidelines based on standard-sized strips (about 1 inch by 4 inches). If you made yours bigger or smaller, adjust accordingly. Snickers gets one strip after his walk and sometimes a second one broken into pieces during training. Two strips per day, never more.
Jerky also works great as a high-value training treat. Break a single strip into 6 to 8 tiny pieces and use them during training sessions. The smell is strong enough that your dog stays focused, and each piece is small enough that they don’t get full halfway through the session. I switched from store-bought training treats to jerky pieces about three months ago and Snickers’ recall improved noticeably. Might be coincidence. Probably isn’t.
What Not to Add
A lot of jerky recipes online (meant for humans) include seasonings that are dangerous for dogs. Quick list of what to leave out.
- Garlic and onion powder. Both are toxic to dogs. Even small amounts can damage red blood cells over time.
- Soy sauce or Worcestershire sauce. Way too much sodium. Dogs need a fraction of the salt humans eat.
- Black pepper and chili flakes. Not toxic, but they irritate the stomach lining and dogs don’t enjoy spicy food.
- Liquid smoke. Contains compounds that are questionable for dogs in concentrated form. Skip it.
- Sugar, honey, or maple syrup. Unnecessary calories. The turkey tastes good enough to your dog without sweetener.
Plain turkey with an egg binder is all you need. If you want to add flavor safely, a teaspoon of dried parsley, a pinch of turmeric, or a sprinkle of dried oregano are all dog-safe. But honestly, Snickers has never once looked at his jerky and wished it had more seasoning.
Troubleshooting
A few things that can go wrong and how to fix them.
- Jerky crumbled instead of holding together. You probably skipped the egg or didn’t mix it in well enough. The egg is the binder. Without it, ground meat falls apart when dried. Make sure it’s evenly distributed through the mixture.
- Strips are burnt on the edges, raw in the middle. Uneven thickness. Next time, spend an extra minute with the rolling pin making sure the whole sheet is the same depth. For the dehydrator, make sure all strips are roughly the same size.
- Jerky came out oily and greasy. The turkey was too fatty. Use 93/7 or leaner. If that’s not available, blot aggressively with paper towels during drying and again after cooling.
- It went bad after just a few days. It wasn’t dry enough. The center probably still had moisture. When in doubt, dry it longer. Overdried jerky is still a great treat. Underdried jerky grows mold.
- My dog won’t eat it. Unlikely with turkey jerky, but if it happens, try warming a strip in the microwave for 5 seconds. The heat releases the smell, and smell is 90% of the sell for dogs.
The Smell That Travels
Three dollars and twenty-three cents. A baking sheet. Two hours. And a dog who thinks the kitchen is the most important room in the house.
I’m a dog owner who makes way too many treats, but I’m not a veterinarian or certified animal nutritionist. Turkey jerky is a treat, not a complete meal. If your dog has specific health conditions or you’re unsure about introducing new foods, check with your vet first.
Happy jerky making!