
You know those mornings when you’re running low on dog treats and your pup is looking at you like it’s the end of the world?
That happened to me last Tuesday. I opened the treat jar to find exactly three sad-looking biscuits rattling around at the bottom, and Snickers was doing her whole “I’m starving and you’ve clearly forgotten about me” routine.
I didn’t have time to run to the pet store, but I did have a spotty banana on the counter and some peanut butter in the pantry.
Turns out, that’s pretty much all you need to make a batch of homemade dog biscuits that’ll have your pup thinking you’re the best thing since squeaky toys.
Why Your Dog (and You) Will Love These Biscuits
- Pantry-Staple Simplicity
These biscuits use ingredients you probably already have at home.
- Natural Sweetness Without Added Sugar
The overripe banana provides natural sweetness and moisture, making these treats appealing to even picky eaters.
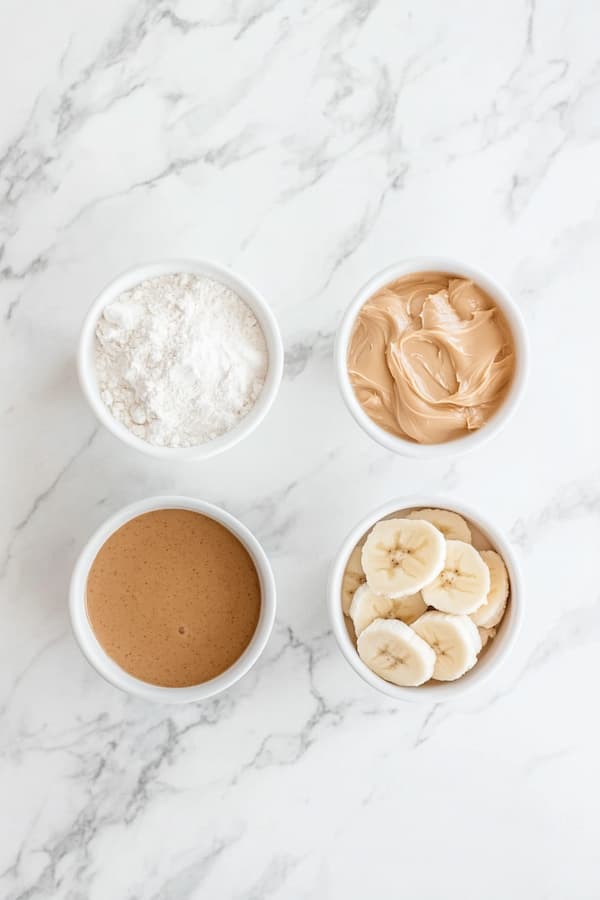
4-Ingredient Banana Peanut Butter Dog Biscuits Recipe
Ingredients
| Ingredient | Amount |
|---|---|
| Wheat flour | 1 cup |
| Overripe banana (small) | 1 |
| Peanut butter (unsalted, xylitol-free) | ½ cup |
| Chicken stock (low sodium) | ⅓ cup |
| Turmeric (optional) | 1 teaspoon |
Important Note on Peanut Butter: Always check your peanut butter label before using it in dog treats. Make absolutely certain it does not contain xylitol, an artificial sweetener that is extremely toxic to dogs.
Step-by-Step Baking Instructions

Step 1: Prepare Your Baking Setup
Set your oven to 350°F (180°C) and let it come to full temperature while you work with the dough. Cover a baking sheet completely with parchment paper, making sure it lies flat without wrinkles. Gather all your ingredients and measuring tools on the counter so everything is within easy reach.
Step 2: Mash the Banana
Take your overripe banana and place it in a large mixing bowl. Use a fork to mash it thoroughly until it’s mostly smooth with just a few small lumps remaining. The riper the banana, the easier this step becomes and the more natural sweetness it adds.
Step 3: Mix the Wet Ingredients
Add the peanut butter and chicken stock to the mashed banana. Stir everything together with a wooden spoon or sturdy spatula until you have a uniform wet mixture that looks creamy and well-combined. Make sure there are no streaks of unmixed peanut butter remaining.
Step 4: Incorporate the Flour
Pour in about a third of the flour first, stirring it into the wet ingredients until it disappears. Add another third, mixing thoroughly, then finish with the remaining flour. If you’re using turmeric for its anti-inflammatory benefits, stir it in with the final flour addition. Keep mixing with firm, steady strokes until the dough pulls together into a cohesive mass that no longer sticks heavily to the sides of the bowl.
Step 5: Roll and Cut the Dough
Dust your hands lightly with flour and scoop all the dough from the bowl, forming it into one large ball. Place the dough ball on a clean, lightly floured surface or directly on a sheet of parchment paper. Using a rolling pin, flatten the dough evenly, aiming for about ¼ inch thickness throughout. Roll with steady pressure, turning the dough occasionally to maintain an even thickness.
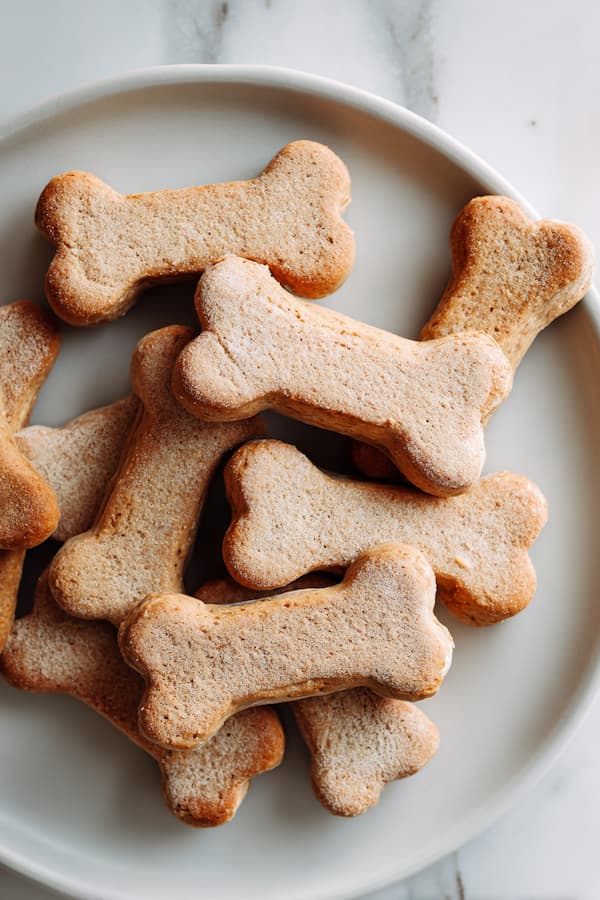
Step 6: Shape Your Biscuits
Take your bone-shaped cookie cutter (or any shape your pup would appreciate) and press straight down through the dough, then lift directly up to keep the edges clean. If you’d like, press a fork gently into the center of each bone shape to create a decorative pattern. Transfer each cut biscuit to your prepared baking sheet, leaving about half an inch of space between them.
Step 7: Bake and Cool
Slide the baking sheet onto the center rack of your preheated oven. Check the biscuits at 16 minutes—they should look lightly golden on the edges and feel firm when you touch the top. If they still seem soft or pale, give them another 2 minutes. When they’re done, remove the baking sheet from the oven and let the biscuits sit undisturbed on the pan for about 10 minutes. Then move them to a cooling rack or plate and wait until they’re completely cool.
Storage and Freshness Tips
Counter Storage (Up to 1 Week): Keep fully cooled biscuits in an airtight container at room temperature. These work well for daily treating when you’re going through them quickly.
Refrigerator Storage (2-3 Weeks): For longer freshness, store your biscuits in a sealed container in the fridge. The cold storage helps prevent any moisture-related issues. Allow them to sit out for 5-10 minutes before serving if your dog prefers room temperature treats.
Freezer Storage (Up to 3 Months): These biscuits freeze beautifully. Arrange them in a single layer on a tray and freeze for an hour, then pack them into freezer bags with as much air pressed out as possible. Grab individual biscuits as needed and let them thaw for 15-20 minutes, or give them frozen if your dog enjoys a crunchy, cold treat.
Serving Suggestions by Dog Size
| Dog Weight | Biscuit Size | Daily Limit |
|---|---|---|
| Under 15 lbs | ½ regular biscuit | 1-2 pieces |
| 15-30 lbs | 1 regular biscuit | 2-3 biscuits |
| 31-50 lbs | 1 regular biscuit | 3-4 biscuits |
| 51-70 lbs | 1-2 regular biscuits | 4-5 biscuits |
| Over 70 lbs | 1-2 regular biscuits | 5-6 biscuits |
Remember, these are guidelines based on typical dogs. Your individual pup’s needs might differ based on their activity level, age, metabolism, and overall health. Watch how your dog responds and adjust accordingly.
When in doubt about what’s appropriate for your specific dog, especially if they have health conditions, check with your veterinarian for personalized advice.
As a general rule of thumb, treats should not count for more than 10% of your dog’s total daily calorie intake.
Nutritional Benefits for Your Dog
- Potassium and Heart Health
Bananas provide potassium, which supports healthy heart function and helps maintain proper muscle and nerve activity. This makes these treats particularly nice for active dogs.
- Protein Power from Peanut Butter
Peanut butter delivers plant-based protein and healthy fats that support your dog’s energy levels and coat health. The natural oils also help keep the biscuits moist.
- Turmeric’s Anti-Inflammatory Properties
If you include the optional turmeric, you’re adding a natural anti-inflammatory ingredient that may support joint health, especially beneficial for older dogs or active breeds prone to inflammation.
Common Questions About These Biscuits
What if I don’t have chicken stock?
Low-sodium beef broth works just as well, or you can use plain water in a pinch. The liquid’s main job is binding the ingredients together, though stock does add extra flavor that dogs find appealing.
Can I make these grain-free?
Absolutely. Replace the wheat flour with oat flour or coconut flour. With coconut flour, you’ll need less (start with ⅔ cup), as it’s more absorbent. With oat flour, use the same amount as the wheat flour called for.
How ripe should the banana be?
The more brown spots, the better. Overripe bananas are sweeter, easier to mash, and provide better moisture for the dough. That banana you were about to throw away? Perfect for this recipe.
Final Thoughts
So there it is, my emergency “we’re out of treats” recipe that’s become a regular feature in our kitchen.
Nothing elaborate, just four simple ingredients that come together into something that makes Snickers prance around like he’s won the lottery.
From our kitchen to yours, I hope your pup loves these as much as mine does. Happy baking!