
Genius. That’s what baby food is for dog treats. It’s already perfectly smooth, pre-cooked, and comes in flavors dogs love. Plus, it’s made for babies, so you know the quality standards are high.
I stumbled onto this recipe when I had leftover baby food from visiting my niece and didn’t want it to go to waste. Two ingredients, twenty minutes, and I had a batch of soft, flavorful treats my dog couldn’t get enough of.
Now I actually buy baby food specifically for making these (but don’t tell anyone lol!)
This might be the easiest dog treat recipe I’ve ever made, and the results taste like you put in way more effort.
Why These Baby Food Treats Are a Must-Try
- Ultimate Convenience
Baby food jars are pre-portioned, shelf-stable, and come in countless flavor combinations.
- Soft Texture for Special Needs
These drop cookies have a tender, easy-to-chew texture that’s ideal for senior dogs with dental issues, puppies still developing their teeth.
- Minimal Cleanup
One food processor (or bowl), one baking sheet, one spoon. That’s it.
Two-Ingredient Baby Food Dog Treats Recipe
Makes approximately 17 tablespoon-sized treats (more if you make them smaller)
Ingredients
| Ingredient | Amount |
|---|---|
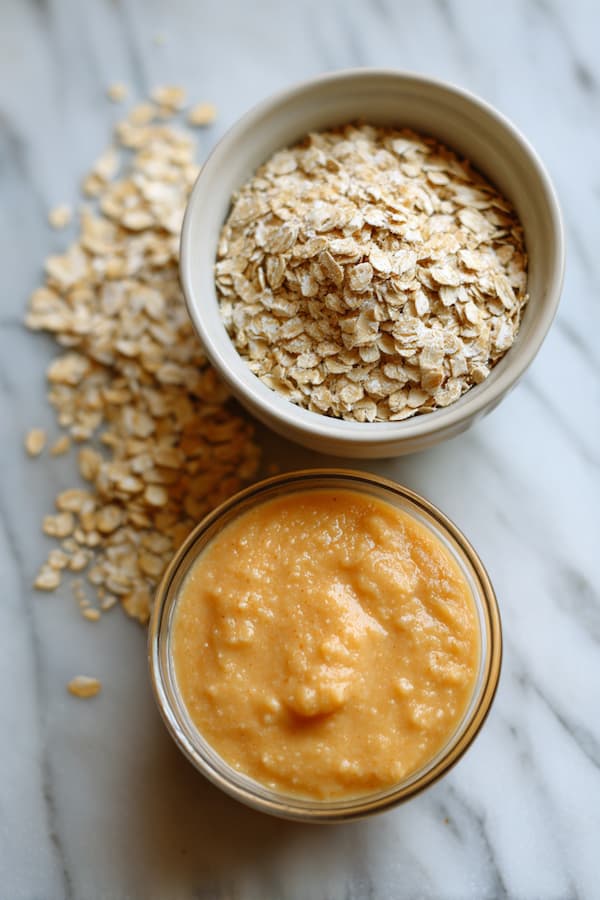
| Turkey and sweet potato baby food | 2 jars (4 oz each) |
| Oatmeal (old-fashioned or quick oats) | 1½ cups |
Ingredient Notes
Baby food – Look for Stage 2 or Stage 3 baby food with minimal ingredients. The label should list turkey, sweet potatoes, and water—that’s it. Avoid baby food with onions, garlic, added salt, or seasonings. Beech-Nut and Gerber both make good options.
Flavor Variations: You can substitute other baby food flavors like chicken and vegetables, beef and carrots, or even just plain sweet potato or pumpkin. Just make sure whatever you choose doesn’t contain ingredients toxic to dogs.
Oatmeal – Old-fashioned rolled oats or quick oats both work perfectly. Instant oats work too but create a slightly mushier texture.
Step-by-Step Instructions
Step 1: Grind Your Oats
Add the 1½ cups of oatmeal to your food processor. Pulse for 15-20 seconds until the oats break down into a coarse flour. You’re looking for a texture somewhere between whole oats and fine powder—small pieces are fine, but you don’t want large oat flakes remaining.
Step 2: Process Until Combined
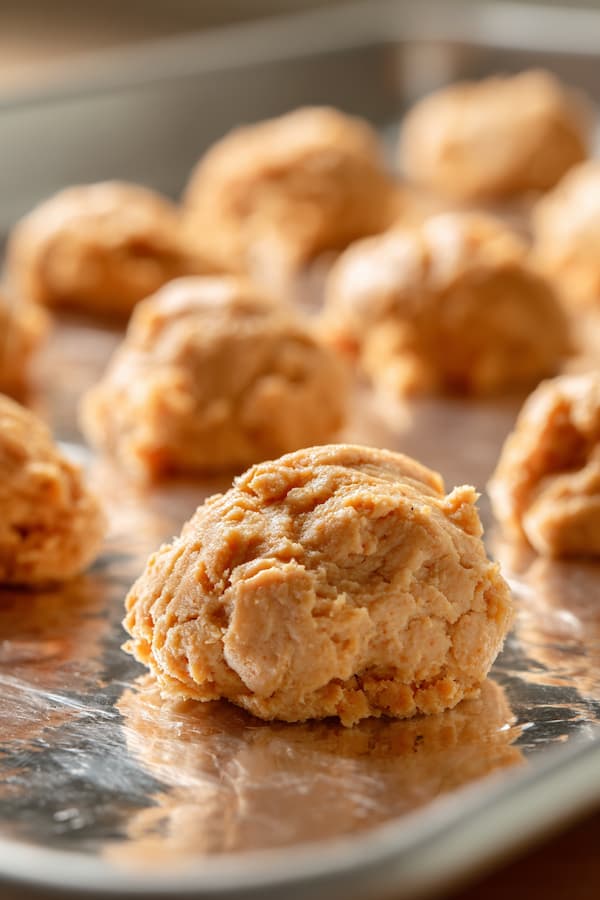
Pulse 8-10 times to start incorporating the baby food into the oats. Then run the processor continuously for 15-20 seconds until everything comes together into a thick, uniform mixture.
Step 3: Check Your Consistency
The mixture should be thick and sticky, similar to wet cookie dough or thick hummus. It should hold together when pressed but still be soft and scoopable.
Step 4: Scoop Your Treats
Using a regular tablespoon (or a cookie scoop for more uniform sizing), scoop up balls of the mixture and drop them onto your prepared baking sheet. For smaller dogs, use a teaspoon or half-tablespoon. For training treats, use a ½ teaspoon for tiny bite-sized pieces.
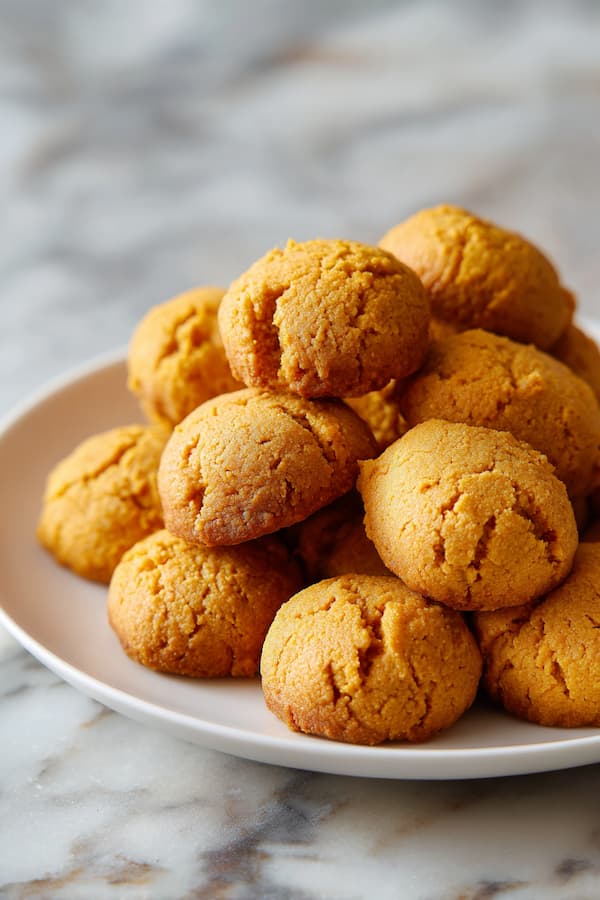
Step 5: Bake Until Set
Place the baking sheet in the preheated oven. Bake for 20-22 minutes at 350°F for tablespoon-sized treats. Smaller treats need less time (15-18 minutes), while larger treats may need 24-26 minutes. The treats are done when they feel firm to the touch and the edges look slightly dry and darker in color.
Step 6: Cool Completely
Remove from the oven and let the treats cool on the baking sheet for 5 minutes. They’ll be quite soft when hot but will firm up as they cool. After 5 minutes, transfer them to a wire cooling rack and let them cool completely (at least 20 minutes).
How to Store for Maximum Freshness
Refrigerator Storage (Up to 2 Weeks):
Since these treats contain baby food, they must be refrigerated. Store cooled treats in an airtight container and keep them in the fridge for up to 2 weeks. The cool temperature helps maintain their soft, chewy texture.
Freezer Storage (Up to 3 Months):
These treats freeze well for longer storage.
- Layer in a freezer-safe container with parchment paper between layers.
- Label and freeze for up to 3 months.
- Thaw overnight in the fridge, or let sit at room temperature for 15–20 minutes.
- Many dogs love them served frozen on warm days for a refreshing chew!
Do not store at room temperature. The baby food makes them spoil quickly. Always refrigerate or freeze within 2 hours of baking.
Serving Tips and Safety Notes
| Dog Weight | Treat Size | Daily Limit |
|---|---|---|
| 5-15 lbs | ½ tablespoon size | 2-3 treats |
| 16-30 lbs | 1 tablespoon size | 3-4 treats |
| 31-50 lbs | 1 tablespoon size | 4-5 treats |
| 51-70 lbs | 1-2 tablespoon size | 5-6 treats |
| 71+ lbs | 2 tablespoon size | 6-8 treats |
Perfect for Senior Dogs: The soft, moist texture makes these treats ideal for older dogs with dental issues. They’re easy to chew and won’t hurt sensitive teeth or gums.
Puppy-Friendly: Puppies over 8 weeks can enjoy these treats in small amounts. The baby food is already formulated for sensitive systems, making these gentler than many dog treats.
Calorie Awareness: While these treats are wholesome, they contain calories from the oats and protein/fat from the turkey. Factor them into your dog’s daily intake and adjust meals slightly if giving multiple treats.
FAQs
Can I use other baby food flavors?
Absolutely! Turkey and sweet potato is just one option. Try chicken and apples, beef and vegetables, or plain pumpkin. Just always check the ingredients for anything toxic to dogs (onions, garlic, grapes, etc.). Stick with single-ingredient or simple combination baby foods.
Can I make these without a food processor?
Yes! Use pre-ground oat flour (or buy it), then simply mix it with the baby food in a bowl using a fork or spoon. It takes more elbow grease but works fine.
How can I make these crunchier?
Bake them longer (25-30 minutes) at the same temperature until they’re quite firm and dry. You can also bake them at 300°F for 35-40 minutes for a crispier result. Let them cool completely—they’ll crisp up more as they cool.
Final Words
And there you have it. Two ingredients, one bowl, and you’ve got treats that taste like you fussed over them for hours.
The baby food method is a game-changer, especially if you have a dog with special dietary needs or texture preferences. Soft enough for sensitive mouths, flavorful enough for picky eaters, and convenient enough to make on a busy weeknight.
Make a batch, stash them in your fridge, and enjoy having homemade treats ready whenever your pup deserves something special. Which, let’s be honest, is pretty much always.