
Some evenings, I feel like I’m running a circus act. Homework at the table, dinner on the stove, and Snickers sitting in the kitchen doorway giving me those “don’t forget me” eyes.
Between the kids asking for help with math problems and me trying not to burn the pasta, the last thing I want is a complicated recipe for dog treats.
That’s exactly why these 4-ingredient chicken bites have become a lifesaver.
They’re quick enough to throw together in the middle of the chaos, healthy enough that I don’t feel guilty, and simple enough that even the kids can help cut them into little bone shapes.
Why These Treats Deserve a Spot in Your Kitchen
- Ideal Training Size and Texture
Baked to a firm but not hard consistency, these treats break cleanly for smaller rewards during intensive training sessions without creating crumbly mess.
- Budget-Friendly Excellence
Canned chicken costs a fraction of premium training treats, and this recipe yields dozens of treats for just a few dollars.
- Allergy-Friendly Foundation
With only four simple ingredients, these treats work for most dogs with food sensitivities, and they’re easy to modify for specific dietary needs.
4-Ingredient Chicken Dog Treats Recipe
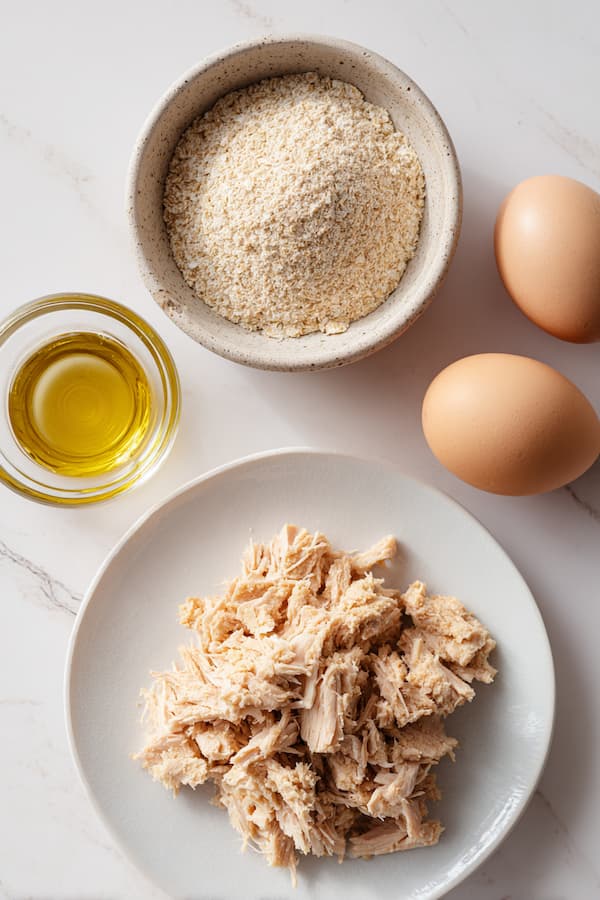
Ingredients
| Ingredient | Amount |
|---|---|
| Canned chicken (with liquid) | 1 can (10 oz) |
| Old-fashioned oats | 2⅓ cups |
| Large egg | 1 |
| Coconut oil | 1½ tablespoons |
Step-by-Step Baking Instructions
Step 1: Prep the Oven, Workspace, and Ingredients
Preheat oven to 350°F (180°C) and position the rack in the center. Line a baking sheet with parchment paper. Add old-fashioned oats to a food processor or blender, pulsing 15–20 times until flour-like, then measure exactly 2⅓ cups and set aside. Melt coconut oil in the microwave (10–15 seconds) or a saucepan over low heat, cooling 5–10 minutes until comfortably warm to touch.
Step 2: Mix the Wet Ingredients
Crack the egg into a medium bowl and whisk with cooled coconut oil until pale yellow and emulsified. Open the canned chicken and add both meat and liquid to the bowl. Break up larger chunks with a fork until the chicken is shredded and evenly distributed. Fold mixture until cohesive, with no large clumps remaining (it should still look quite wet).
Step 3: Form the Dough
Sprinkle ground oats into the wet mixture in three additions, folding after each one. Use a spatula to scrape the sides and bottom so everything incorporates. Continue mixing firmly for 2–3 minutes until the dough holds together. Proper texture should be soft but not sticky (able to form a ball without crumbling). If too wet, add oats 1 tablespoon at a time; if too dry, add water ½ teaspoon at a time.
Step 4: Roll and Cut the Dough
Shape the dough into a ball and place it between two sheets of parchment paper. Roll evenly with a rolling pin to about ⅛ inch thickness, working from the center outward. Remove the top parchment and cut shapes with cookie cutters, bone shapes are always fun, but any cutter works. Press straight down for clean edges, then transfer the treats to the lined baking sheet, spacing them ½ inch apart.
Step 5: Bake and Cool the Treats
Bake on the center rack for 25 minutes. Treats are ready when golden brown on the bottom, firm to touch, and slightly darker around edges. Remove and cool on the baking sheet 5–10 minutes, then transfer to a wire rack until completely cool (30–45 minutes). Finished treats should snap slightly when broken, be cooked through without doughy centers, and carry a pleasant chicken aroma without burnt notes.


Storage Solutions
- Fridge (2–3 Weeks): Store cooled treats in airtight containers with parchment between layers. Glass or rigid plastic works best—avoid bags. Let sit 10–15 minutes before serving.
- Freezer (Up to 6 Months): Flash-freeze on a baking sheet, then transfer to freezer bags, squeezing out air. Freeze in small portions for easy access. Safe beyond 6 months, but taste may suffer.
- Serving: Thaw in fridge overnight or serve frozen/room temp depending on your dog’s preference.
Daily Treat Recommendations
| Dog Weight | Treat Size | Daily Maximum |
|---|---|---|
| 5-15 lbs | Small (1 inch) | 2-3 treats |
| 16-30 lbs | Medium (1.5 inch) | 3-4 treats |
| 31-50 lbs | Medium (1.5 inch) | 4-5 treats |
| 51-70 lbs | Large (2 inch) | 5-6 treats |
| 71+ lbs | Large (2 inch) | 6-8 treats |
Training Sessions: Break treats into smaller pieces for frequent rewards. One medium treat can become 4-6 training rewards.
Puppies (12+ weeks): Start with ¼ of recommended amount and monitor for digestive tolerance. These treats are rich in protein.
Senior Dogs: Perfect texture for older dogs. Consider the soft-bake version for those with significant dental issues.
These are general guidelines, not strict rules. Every dog is different, and factors like breed, age, health, and metabolism can all affect what’s best. Pay close attention to your dog’s response and adjust as needed. I’m not a professional pet nutritionist, so if you’re unsure about what’s right for your pup, it’s always best to check with your veterinarian.
Health Benefits of the Treats
- Digestive Health Support
The soluble fiber from oats supports healthy digestion and beneficial gut bacteria. The simple ingredient list makes these treats easy to digest, even for dogs with sensitive stomachs.
- Weight Management Friendly
Despite being high-protein, these treats are relatively low in calories compared to many commercial options. The fiber content also helps dogs feel satisfied.
- Allergy Management
These treats are suitable for most dogs with food sensitivities. Easy to identify problem ingredients if reactions occur.
Frequently Asked Questions
Can I use fresh chicken instead of canned?
Fresh cooked chicken works but requires more preparation. You’ll need to cook, shred, and add chicken broth to replicate the moisture content of canned chicken.
Can puppies eat these treats?
Puppies over 12 weeks old can enjoy these treats in small amounts. Start with tiny portions to ensure their digestive systems handle them well.
How do I know if the chicken I’m using is dog-safe?
Check the ingredient list—it should only contain chicken and water. Avoid anything with added salt, garlic, onion, or other seasonings.
Final Thoughts
And there you have it – my go-to chicken treat recipe, passed from my kitchen to yours. Nothing fancy, nothing complicated, just a simple little tradition that makes Snickers’ tail wag every single time. Consider this my gift to you and your pup (because good things, especially the homemade kind, are meant to be shared). Happy baking!