Last fall I spent a Sunday afternoon parked over a stockpot of turkey and rice for Snickers, my Cavalier, stirring every few minutes so the bottom wouldn’t scorch. The kitchen window was fogged over and my sleeve smelled like boiled turkey until bedtime.
Meanwhile my own dinner was roasting in the oven on a single sheet pan. Chicken thighs, carrots, a few chunks of sweet potato, all cooking with zero help from me.
Snickers had already figured out which one smelled better.
He wasn’t watching the pot. He was lying flat on the tile in front of the oven door, nose an inch from the glass, like it was his favorite TV show.
That’s when it clicked. Why was I babysitting a pot for 40 minutes when the oven could cook his food the same way it cooked mine?
The next Sunday his food went on a sheet pan instead. Two recipes came out of that experiment, and they’ve owned my dog-food Sundays ever since.
At a Glance: Both Sheet Pan Recipes Side by Side
| # | Recipe | Protein | Oven | Makes | Best for |
|---|---|---|---|---|---|
| 1 | Turkey and Sweet Potato Sheet Pan Bake | 93% lean ground turkey | 375°F until the center reads 165°F | 30 squares, about 100 calories each | Easy portions, dogs who pick around veggies |
| 2 | Chicken and Veggie Sheet Pan Dinner | Boneless, skinless chicken thighs | 400°F until the chicken reads 165°F | Roughly 10 cups, about 1,950 calories | Dogs who love a chunky, “real dinner” texture |
Start with Recipe 1. It portions itself, and there’s nothing for a picky dog to eat around.
Three Rules Before the Oven Goes On
Before the recipes, three rules. I don’t bend on any of them.
- Trust a thermometer, not the color
Ground turkey and chicken are safe at 165°F, ground beef at 160°F, according to the USDA safe temperature chart. Meat mixed with sweet potato can look done on top and still be underdone in the middle.
Poke the thermometer into the thickest spot in the center of the pan, not the edge. The edges always finish first.
- Nothing from your spice rack
No salt, no seasoning blends, no butter. Onion, garlic and chives can damage a dog’s red blood cells and lead to anemia, in fresh or powdered form (ASPCA).
This one catches people who adapt a human sheet pan dinner. If you’re unsure about an ingredient, check it against my list of foods dogs can and can’t eat first.
- Lean meat, fat poured off, no bones
Use 93% lean ground meat and boneless, skinless chicken. A fatty meal can trigger pancreatitis in some dogs (VCA Animal Hospitals), so whatever pools at the edges of the pan goes in the trash.
Bones stay out. Even small ones can splinter.
Recipe 1: Turkey and Sweet Potato Sheet Pan Bake
Think of this one as dog meatloaf, flattened. Everything gets mixed raw, pressed into the pan and baked in one even layer, then cut into squares you can grab straight from the freezer.
The grated sweet potato melts into the turkey, so there’s nothing to spit out.
Snickers has tried. He failed.
If you’d rather bake a classic loaf, my turkey meatloaf for dogs does a similar job in a loaf pan. The sheet pan version just cooks faster and cuts cleaner.
Ingredients
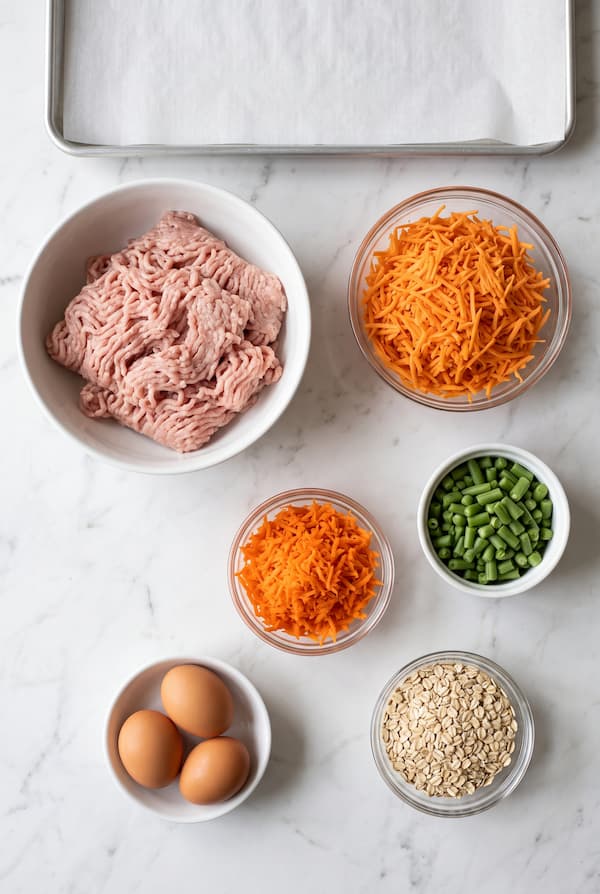
| Ingredient | Amount | Notes |
|---|---|---|
| 93% lean ground turkey | 3 lb (1.36 kg) | 93% lean ground beef works too (see the FAQ) |
| Sweet potato | 1 big or 2 medium, about 1 lb (450 g) | Peeled and finely grated |
| Carrots | 3 medium, about 7 oz (200 g) | Finely grated |
| Green beans | 1 cup chopped (110 g) | Fresh, or frozen and thawed |
| Eggs | 3 large | The binder |
| Rolled oats | 1 cup (80 g) | Plain old-fashioned oats, no sugar |
You’ll also need an 18×13-inch half sheet pan with a rim, parchment paper and an instant-read thermometer.
The weights are there on purpose. Tufts vet nutritionists flag vague amounts like “2 cups of chicken” as a red flag in homemade recipes, because the calories can swing a lot (Tufts Petfoodology).
Step 1: Heat the Oven and Line the Pan
Set the oven to 375°F with a rack in the middle. Line the pan with parchment and let it hang over the two long sides.
Don’t skip the parchment. My first pan went in without it, and I spent twenty minutes scraping baked-on turkey off the corners (and yes, I’ve only made that mistake once).
Step 2: Grate the Sweet Potato and Carrots
Peel the sweet potato, then run it and the carrots through the fine side of a box grater or the grating disc of a food processor. Grate them fine, not chunky, so the shreds cook through in the same time as the meat.
Raw sweet potato is hard on a dog’s stomach, and the AKC says never to feed it raw. Fine shreds make sure every bit of it gets cooked.
Chop the green beans small, about pea-sized for little dogs. Frozen green beans are fine, just thaw them and pat them dry first.
Step 3: Mix It All by Hand
Add the turkey, eggs, oats and all the veggies to your biggest bowl. Mix with clean hands for about 2 minutes, until you can’t see streaks of plain meat anymore.
A spoon won’t get there. Hands do.
Wash your hands and wipe the counter right after, same as you would for your own meatloaf.
Step 4: Press It Into an Even Layer
Dump the mix onto the lined pan and press it out to the corners with your palms. Aim for about 3/4 inch thick everywhere, with no mound in the middle.
An even layer is the whole trick. A thick middle means dry edges while you wait for the center to catch up.
Step 5: Bake Until the Center Reads 165°F
Bake for roughly 30 to 40 minutes, and start checking at 25. Push the thermometer into the center of the pan and keep baking until it reads 165°F.
Ovens vary a lot, so the thermometer gets the final word, not the clock. Done looks firm and lightly browned, with clear juices at the edges.
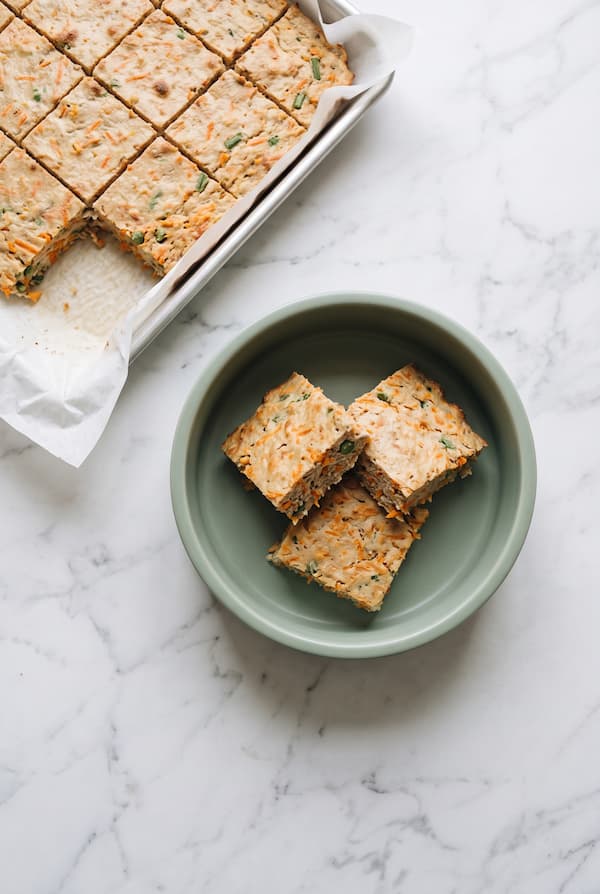
Step 6: Pour Off the Fat and Cut 30 Squares
Carefully tilt the pan and pour the liquid from the edges into an old can. Let the slab cool for about 15 minutes so it holds together.
Use the parchment overhang to lift the whole slab onto a cutting board. Cut it into 5 rows by 6 columns with a pizza cutter or a long knife, and you’ve got 30 squares at about 100 calories each.
That’s the one I make most weeks. The next recipe is for when you want something that looks more like an actual dinner.
Recipe 2: Chicken and Veggie Sheet Pan Dinner
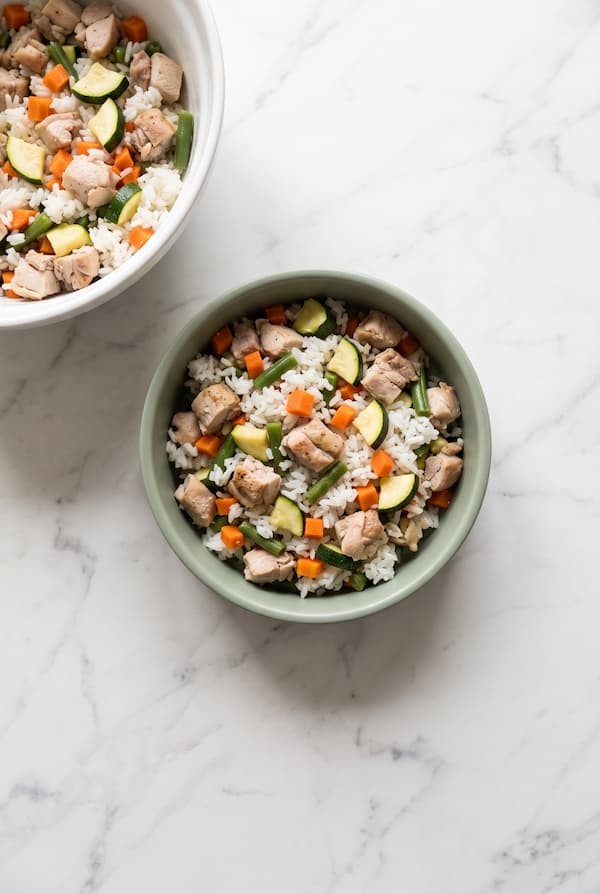
This is the classic “pup sheet pan dinner” people love posting in homemade dog food groups. Chicken on one side, veggies on the other, everything roasted at once and tossed with plain rice.
It takes a bit more chopping than Recipe 1. The payoff is a chunky texture a lot of dogs go nuts for.
Ingredients
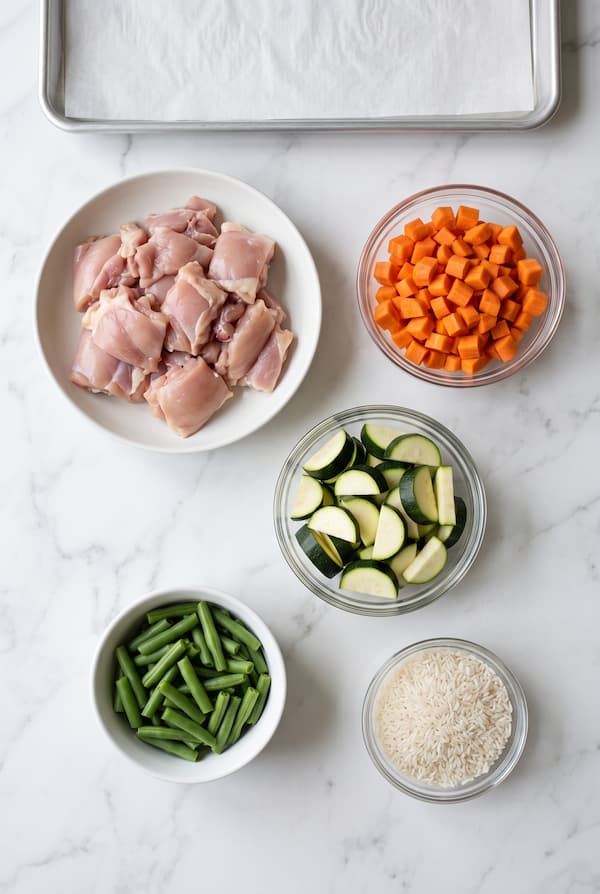
| Ingredient | Amount | Notes |
|---|---|---|
| Boneless, skinless chicken thighs | 2 lb (907 g) | Trim off the white strips of fat |
| Carrots | 3 medium, about 7 oz (200 g) | Diced into 1/2-inch pieces |
| Zucchini | 1 medium, about 7 oz (200 g) | Cut into 1/2-inch half-moons |
| Green beans | 1 1/2 cups (165 g) | Cut into 1-inch pieces |
| White rice | 1 cup uncooked (185 g) | Cooked plain, makes about 3 cups |
I leave broccoli out of this one on purpose. The AKC says to keep it to very small amounts because it can irritate some dogs’ stomachs, and a gassy dog on the couch is nobody’s idea of a cozy evening.
Want to swap a veggie? My guide to the best vegetables for dogs covers which ones roast well and which ones to skip.
Step 1: Start the Rice and Heat the Oven
Heat the oven to 400°F. Cook the rice on the stove in plain, unsalted water while you prep everything else.
White rice is the gentler pick for sensitive stomachs. Brown rice works too, it just takes longer.
Step 2: Cut the Chicken Into Even Pieces
Trim the thighs and cut them into 1-inch pieces. Same-size pieces finish at the same time, so nothing dries out while you wait on one giant chunk.
The first time I made this, I cut the chicken in random sizes. Half of it was overcooked by the time the big pieces hit 165°F.
Step 3: Roast the Chicken and Carrots First
Line the pan with parchment. Spread the chicken on one half and the carrots on the other, in a single layer, and slide it into the oven.
Skip the oil. Parchment keeps everything from sticking, and your dog doesn’t need the extra fat.
Step 4: Add the Zucchini and Green Beans at 10 Minutes
After 10 minutes, pull the pan out and scatter the zucchini and green beans next to the carrots. They cook faster, so they join late.
Roast another 12 to 15 minutes. The chicken is done when the thickest piece reads 165°F, and the veggies are done when a fork slides into a carrot with no push.
Step 5: Chop, Toss and Cool
Let everything cool on the pan for 10 minutes. Then chop the chicken and veggies smaller for small dogs, or leave them chunky for big ones.
Leave the pan juices behind and toss everything with the cooked rice in a big bowl. You’ll end up with roughly 10 cups of food.
Both pans are done. Now the part most sheet pan recipes skip completely.
How Many Squares a Day: Portions by Dog Weight
I ran both recipes through USDA calorie data so you’re not guessing.
Recipe 1 comes to about 3,050 calories per pan, or roughly 100 per square. Recipe 2 lands around 1,950 calories, about 195 per cup.
The daily calories below use the formula vets use for a typical neutered adult dog: 70 × (body weight in kg)^0.75, multiplied by 1.6 (Pet Nutrition Alliance).
| Dog weight | Calories per day | Recipe 1: squares per day | Recipe 2: cups per day | One pan of Recipe 1 lasts |
|---|---|---|---|---|
| 10 lb | about 350 | 3 1/2 | 1 3/4 | about 9 days |
| 20 lb | about 585 | 6 | 3 | about 5 days |
| 30 lb | about 795 | 8 | 4 | about 4 days |
| 50 lb | about 1,165 | 11 1/2 | 6 | about 2 1/2 days |
| 70 lb | about 1,500 | 15 | 7 3/4 | about 2 days |
| 90 lb | about 1,810 | 18 | 9 1/4 | under 2 days |
Split the daily amount into two meals. Treat these numbers as a starting point, not a rule, and remember they only describe a full diet once the calcium from the next section is added.
Older, less active dogs usually need less, and very active dogs need more. Weigh your dog every two weeks and adjust by about 10% if they’re gaining or losing.
Pro tip: if you own a kitchen scale, weigh the whole batch of Recipe 2 and split it by days instead of using cups. Cups change depending on how chunky you chop.
Feeding half homemade, half kibble? Cut both amounts in half, or you’ll end up feeding double without noticing.
Got a big dog? Double Recipe 1, bake two pans on two racks and swap them halfway through.
The thermometer rule doesn’t change. Both pans come out when the center reads 165°F.
Freezing and Reheating a Full Pan
Sheet pan dog food is built for the freezer. Here’s the routine.
- Fridge first. Cooked food should go into the fridge within 2 hours, according to the USDA leftovers guide. Use refrigerated portions within 3 to 4 days.
- Freeze the rest. Frozen food stays safe indefinitely at 0°F, but it dries out over time. I use mine within 3 months.
- Recipe 1 squares. Freeze them on a parchment-lined tray for an hour, then bag them. They won’t stick together, so you can grab exactly as many as you need.
- Recipe 2 portions. Pack one day’s worth per container, or freeze it in 1-cup blocks and pull out as many cups as your dog eats in a day.
- Thaw overnight. Move tomorrow’s food to the fridge tonight. Not the counter.
- Serve cool or barely warm. If you warm it, microwave in short bursts, stir, and check for hot spots with your finger before it hits the bowl.
The freezer tray trick is the one I’d go with if you only change one thing. Pulling two squares out the night before takes five seconds.
If you want to turn this into a full weekly routine, my homemade dog food meal prep guide walks through an entire prep afternoon.
Sunday Belongs to the Oven Now
My dog-food Sundays look completely different these days. The pan goes in, the timer goes on, and I get back the 40 minutes that used to belong to a wooden spoon.
Snickers still hasn’t figured out that the oven isn’t TV. The second the light comes on, he’s on the tile with his nose to the glass, tail sweeping the floor like a windshield wiper.
Make one pan this weekend. Then watch where your dog parks while it bakes.
I’m a passionate dog lover and kitchen enthusiast, but I’m not a certified veterinarian or animal nutritionist. Long-term homemade diets should always be discussed with your vet to make sure your pup is getting everything they need.
Bon appétit to your furry friend!
Affiliate Disclosure: This page contains affiliate links. We earn a small commission when you purchase through these links at no extra cost to you. Thank you for supporting our work!