
It’s a rainy Sunday afternoon, you’re baking cookies for the family, and you feel a wet nose pressing against your leg. The guilt sets in. You want to give them something special, but the treat jar is empty, and you really don’t feel like running to the store.
The good news is that you probably don’t need to.
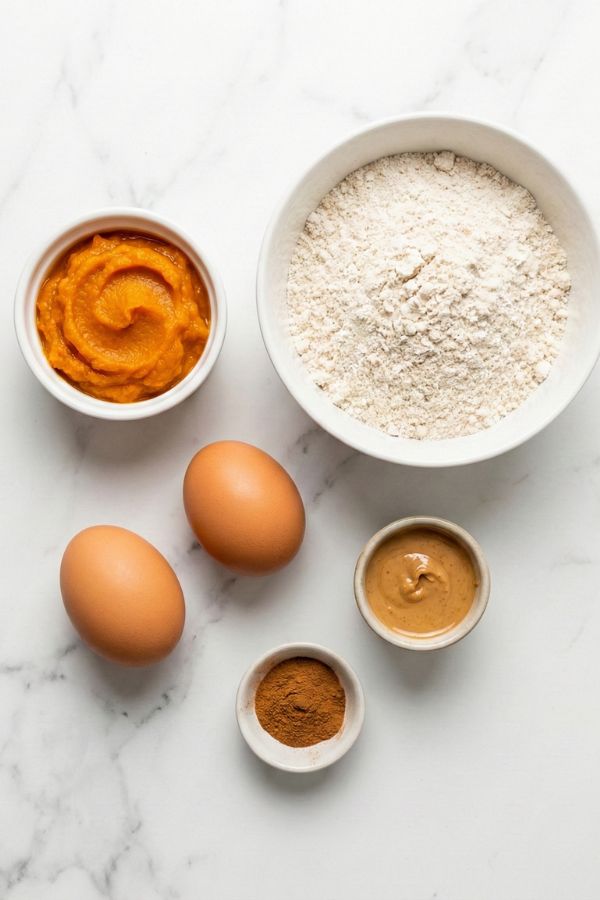
These 5-Ingredient Dog Treats are what I call the “Pantry Raider” special. They use the most common, dog-friendly staples found in almost every kitchen: oats, pumpkin, peanut butter, eggs, and cinnamon.
There’s no running out for exotic flours or expensive supplements.
These treats are crunchy, wholesome, and smell absolutely incredible while baking. Additionally, because they are oat-based, they are naturally wheat-free, making them a great option for dogs with sensitive stomachs or gluten allergies.
Why Your Dog Will Love These
- The “Crunch” Factor: These are baked longer than soft chews, giving them a satisfying snap that helps clean teeth.
- Flavor Explosion: The combination of peanut butter and pumpkin is the canine equivalent of chocolate and peanut butter. It’s irresistible.
- Tummy Soothing: Both pumpkin and cinnamon are known for aiding digestion, making these a treat that feels good and tastes good.
5-Ingredient Dog Treats Recipe
Ingredients Checklist
| Ingredient | Amount |
| Oat Flour | 2 ½ cups |
| Pumpkin Puree | ½ cup |
| Natural Peanut Butter | 2 ½ tbsp |
| Eggs | 2 large |
| Ground Cinnamon | ½ tsp |
| Water | As needed |
Quick Tip: If you don’t have oat flour, simply pulse 2 ½ cups of rolled oats in a food processor until they turn into a powder. It takes 30 seconds and saves you money!
Step-by-Step Instructions
Step 1: Preheat and Prep
Get your oven ready by setting it to 350°F (175°C).
Prepare a baking sheet by lightly greasing it with a tiny bit of coconut oil or olive oil. Alternatively, you can use parchment paper for an easier cleanup.
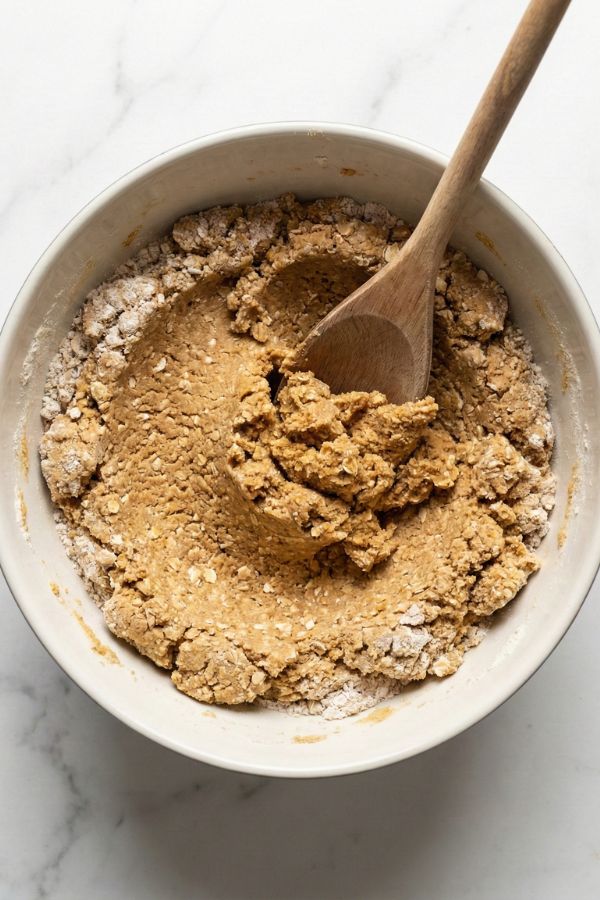
Step 2: The Initial Mix
In a large mixing bowl, crack your 2 eggs. Add the pumpkin puree, peanut butter, and cinnamon. Whisk these wet ingredients together first to break up the peanut butter.
Next, dump in the 2 ½ cups of oat flour.
Start mixing with a spoon. You will notice almost immediately that the mixture looks very dry and crumbly. It might look like there isn’t enough liquid—don’t panic!
Step 3: Hydrate the Dough
This is the “feel it out” stage. Because different brands of flour absorb liquid differently, we add water slowly.
Add water 1 tablespoon at a time.
Abandon the spoon and get your hands in there. Knead the dough in the bowl. You are looking for a texture that holds together firmly without crumbling, but isn’t sticky or wet. It should feel dense, like modeling clay.
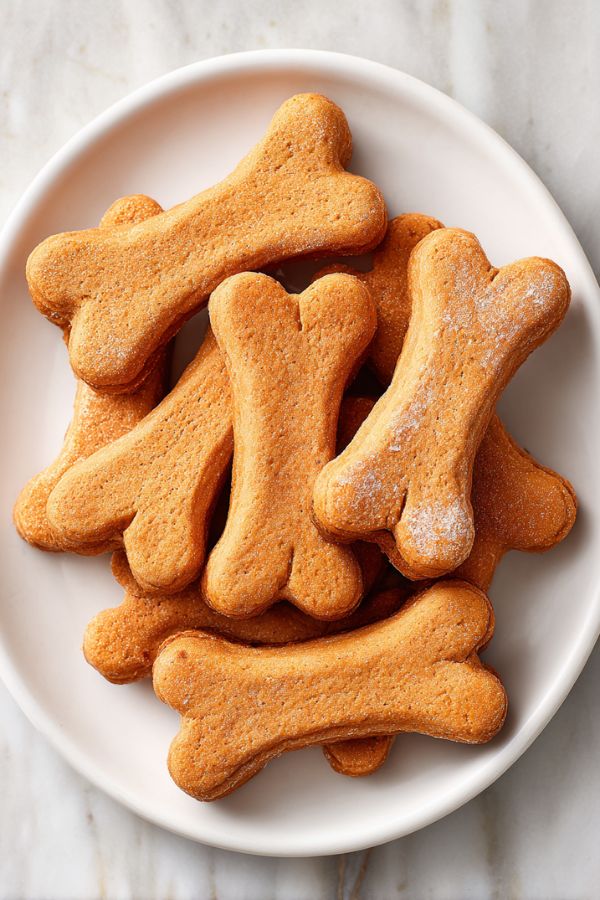
Step 4: Roll and Cut
Dust your clean kitchen counter with a little extra flour. Take your dough ball and roll it out with a rolling pin until it is about ½ inch thick.
Use your favorite cookie cutters to punch out shapes. If you want to maximize the dough (and save time), you can just use a pizza cutter to slice it into a grid of squares.
Step 5: The Long Bake
Place your treats on the greased baking sheet. These don’t puff up or spread, so you can pack them in rows quite close to each other. Bake for 35 minutes.
Check them at the end—they should feel rock hard to the touch. If they still feel soft in the middle, give them another 5 minutes. We want these crunchy!
Feeding Guidelines: Treat Responsibly
We all know the struggle of those puppy dog eyes begging for “just one more.” But even with healthy ingredients, calories count!
Disclaimer
I am a passionate dog lover and a kitchen enthusiast, but I am not a certified veterinarian or animal nutritionist.
While these recipes are made with ingredients generally considered safe for dogs, every animal is different. Some dogs have specific allergies (like eggs or grains) or health conditions that require strict diets.
Always consult with your veterinarian before introducing new foods to your dog’s diet, especially if they have a sensitive stomach or existing health issues.
The Golden Rule
Veterinarians and canine nutritionists universally recommend that treats should make up no more than 10% of your dog’s total daily caloric intake. The other 90% needs to come from their balanced breakfast and dinner to ensure they get all their essential vitamins.
- Small Dogs (under 20 lbs): 1 treat per day.
- Medium Dogs (20-50 lbs): 2-3 treats per day.
- Large Dogs (50+ lbs): 3-4 treats per day.
How to Customize the Flavor Profile
One of the best things about a simple base recipe is how easily you can tweak it to suit your dog’s specific cravings or health needs.
- The “Fresh Breath” Twist: Add a tablespoon of chopped fresh parsley or mint to the dough. It won’t change the texture, but it will help freshen up doggy breath.
- The “Meat Lover” Edition: Swap the cinnamon for a tablespoon of low-sodium beef broth (or just use broth instead of water in step 3). This gives the treat a savory, meaty kick.
- The “Cheesy” Bite: Add a tablespoon of nutritional yeast or grated parmesan cheese for a flavor boost that picky eaters often prefer over sweet treats.
Proper Preservation Techniques
Since we are baking these until they are hard and dry, they have a longer shelf life than soft chews, but moisture is still the enemy.
- The Countertop Jar: If you baked them until they are completely crisp (no moisture left inside), these can live in a cute treat jar on your counter for 2 weeks.
- The Refrigerator: If you pulled them out a little early and they are slightly chewy in the center, they must go in the fridge to prevent mold. They will last up to 3 weeks here.
- The Deep Freeze: Planning ahead? Bake a double batch and throw half in the freezer. They stay fresh for 3 to 4 months. Just pull a few out on Sunday to last you through the week.
Frequently Asked Questions
Is cinnamon actually safe for dogs?
Yes, in small amounts! Cinnamon has anti-inflammatory properties and can help regulate blood sugar. However, it is best to use Ceylon cinnamon if you can find it, as it has lower levels of coumarin.
Can humans eat these?
Technically, yes! Every ingredient in this recipe is human-grade. However, because there is no sugar or salt, you might find them incredibly bland and dry compared to your own cookies.
Can I use regular All-Purpose flour?
Yes. If your dog has no wheat allergies, regular white or whole wheat flour works perfectly as a 1:1 substitute for the oat flour. The dough might just be a little stretchier (thanks to gluten) and easier to roll.
Final Thoughts
There is a special kind of pride that comes from seeing your dog drool over a treat you baked yourself. You know exactly what went into it—no preservatives, no fillers, just wholesome food and a little bit of love.
So, preheat that oven and call your “sous-chef” into the kitchen. It’s time to bake some tails wagging!