
Sometimes, the best things in life are the simplest. We often think that to give our dogs the best, we need complex recipes with mile-long ingredient lists. But the truth is, dogs crave simple, wholesome flavors.
These 4-Ingredient Applesauce Dog Biscuits are the definition of “fuss-free” baking.
Whether you are a novice baker or just short on time, this recipe is fail-proof. By using oat flour and applesauce, you are creating 4-ingredient dog treats that are naturally wheat-free and low in fat, making them perfect for pups with sensitive tummies.
On top of that, the addition of a little turmeric gives them a secret health boost without complicating the process.
Why This Simple Recipe Works
- Pantry Friendly: You likely have the applesauce, peanut butter, and oats in your kitchen right now. No special grocery run required.
- Wheat-Free: We skip the white flour in favor of oat flour, which is gentler on digestion for many dogs.
- Low & Slow Bake: Baking at a slightly lower temperature ensures these treats get crunchy all the way through without burning, making them perfect for satisfying a chewer.
4-Ingredient Applesauce Dog Biscuits Recipe
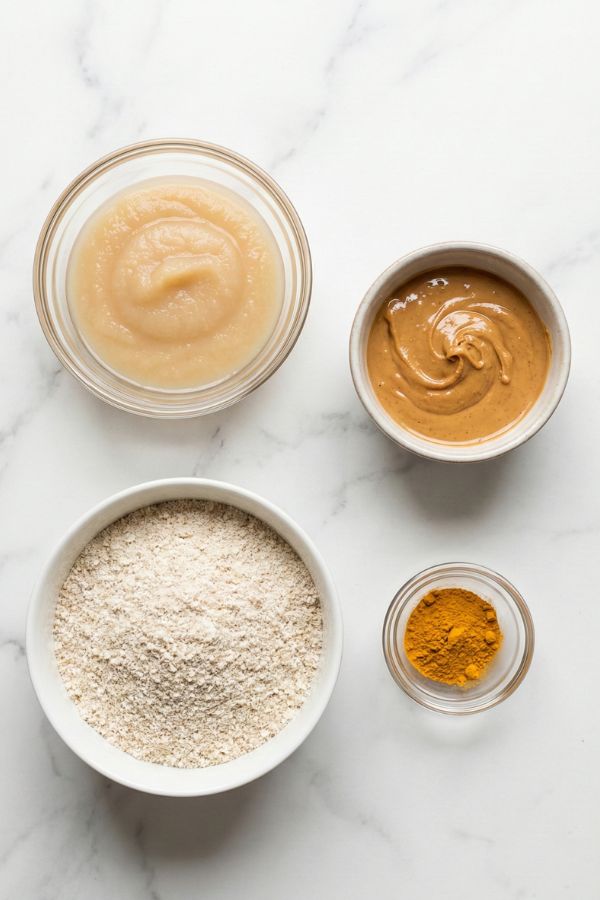
Ingredients
| Ingredient | Amount |
| Unsweetened Applesauce | ⅔ cup |
| Peanut Butter, Xylitol-Free | ½ cup |
| Oat Flour | 2 cups |
| Turmeric | ½ tsp |
Step-By-Step Instructions
Step 1: Prep the Oven
Preheat your oven to 325°F (165°C). This is a bit lower than the standard 350°F. This lower heat helps dry the moisture out of the applesauce evenly.
Line a large baking sheet with parchment paper or a silicone baking mat to prevent sticking.
Step 2: The Wet Mixture
In a large mixing bowl, combine the applesauce and the peanut butter.
Use a sturdy spoon or spatula to mix them until they are thoroughly combined. It should look like a thick, creamy caramel paste.
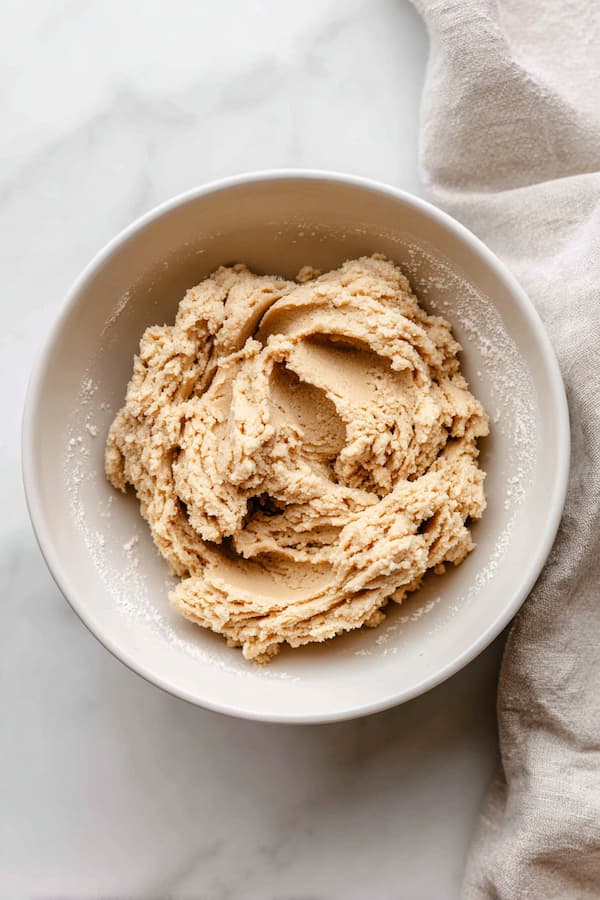
Step 3: Forming the Dough
sprinkle in the turmeric and stir. Now, add the oat flour gradually—about ½ cup at a time.
Stir well after each addition. As you add the last bit of flour, the dough will become stiff and difficult to stir. At this point, switch to using your hands to knead the dough into a ball right inside the bowl. It should form a slightly sticky, but cohesive ball.
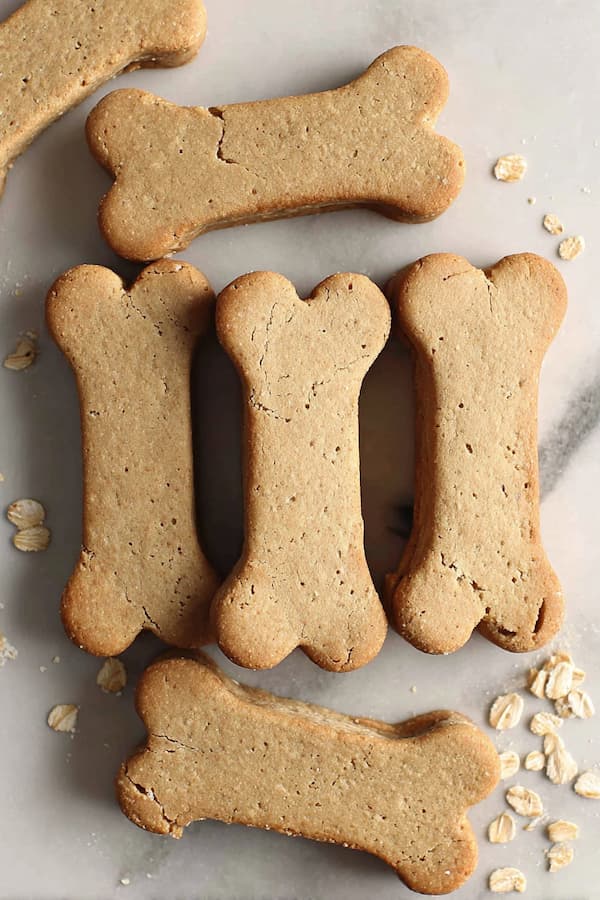
Step 4: Roll and Shape
Dust your countertop or cutting board with a little extra oat flour. Place your dough ball down and flatten it. Roll it out until it is just under ½ inch thick.
Dip your cookie cutter into flour (to keep it from sticking) and cut out your shapes. Gather up the scraps, re-roll them, and keep cutting until you have used all the dough.
Step 5: Bake and Cool
Arrange the biscuits on your prepared baking sheet. Bake for 30 minutes. Remove the pan from the oven, but don’t move the treats yet!
Let them sit on the hot pan for 10 minutes. This resting period allows them to firm up so they don’t crumble when you move them. After 10 minutes, transfer them to a wire rack to cool completely.
The “Drippy” Peanut Butter Fix
A crucial tip for bakers using natural peanut butter.
If you use natural peanut butter (the kind with the oil on top that you have to stir), your dough might end up wetter than expected because of the extra oil content.
- The Fix: If your dough feels too sticky to roll even after adding the 2 cups of flour, simply add more oat flour 1 tablespoon at a time until it feels like workable playdough. Don’t be afraid to adjust as you go!
Making Your Own Oat Flour
Save money by skipping the specialty aisle.
If you don’t have a bag of “Oat Flour” in the pantry, don’t run to the store!
Simply take 2 cups of rolled oats (old-fashioned or quick oats) and pulse them in a blender or food processor for 30-60 seconds until they turn into a fine powder. Voila—you have oat flour for a fraction of the price.
Keeping Treats Fresh
Because these contain applesauce, moisture control is key to keeping them fresh.
- Room Temperature: Store in an airtight container on the counter for up to 5 days.
- The Refrigerator: For longer freshness, keep them in the fridge for up to 2 weeks.
- The Freezer: These freeze beautifully! Toss them in a freezer bag for up to 3 months. They act as a great cool treat on a hot day straight from the freezer.
Feeding Guidelines & Safety
- Treats vs. Meals
These 4-ingredient applesauce dog biscuits are healthy, but they are still treats. They should make up no more than 10% of your dog’s daily calorie intake.
- The Peanut Butter Check
I cannot stress this enough: Check your peanut butter label.Many “low sugar” brands now use Xylitol (sometimes listed as Birch Sugar), which is highly toxic to dogs. Always use a brand that lists only peanuts and salt.
Disclaimer
I am not a veterinarian or a canine nutritionist. While these ingredients are generally safe for most dogs, always consult your vet before introducing new foods, especially if your dog has specific allergies or dietary restrictions.
Frequently Asked Questions
Can I use a different flour if I don’t have oat flour?
Yes, if your dog isn’t sensitive to wheat, you can use regular whole wheat flour as a 1:1 substitute, though the texture might be slightly crispier.
Can I use pumpkin instead of applesauce?
Absolutely, plain pumpkin puree works as a perfect 1:1 replacement for the applesauce if you want a different flavor profile.
Are these treats crunchy or soft?
Baked for 30 minutes, these treats come out with a satisfying “biscuit” crunch, but if you prefer a softer chew for seniors, simply reduce the baking time to 20 minutes.
Final Thoughts
Baking for your dog doesn’t have to be a chore or a science experiment. These 4-ingredient applesauce dog biscuits prove that you can create something nutritious, safe, and delicious with just a bowl, a spoon, and a few pantry staples.
So next time you have a jar of applesauce sitting in the fridge, skip the store-bought bag and spend 30 minutes making something special. Your dog—and their happy, wagging tail—will thank you!