
Last month, I was sitting on the couch with an Oreo in one hand and my phone in the other when Snickers gave me that look (you know the one), where they tilt their head and stare at your snack like you’re committing a crime by not sharing.
I felt guilty for about two seconds before remembering that chocolate is a hard no for dogs.
But then I got thinking: what if I could make her something that looked like an Oreo, had that same satisfying sandwich cookie vibe, but was actually safe for her to eat?
That’s how these carob sandwich cookies were born. Same iconic look, none of the worry, and a creamy yogurt filling that makes Snickers do a little happy dance every single time.
Why These Cookies Are Worth Making
- The Fun of Sandwich Cookies
There’s something undeniably delightful about sandwich cookies. The two-layer presentation makes treat time feel extra special, and dogs seem to appreciate the textural variety between the crunchy cookie and creamy filling.
- Safe Chocolate Alternative
Carob powder gives these cookies a rich, slightly sweet flavor and dark color that mimics chocolate, but it’s completely safe for dogs. No theobromine, no toxicity concerns.
- Interactive Treat Experience
Dogs enjoy working their way through the layers of these sandwich cookies. It’s more engaging than a simple biscuit and keeps them occupied a bit longer, which makes these perfect for special occasions.
Oreo Sandwich Cookies for Dogs Recipe
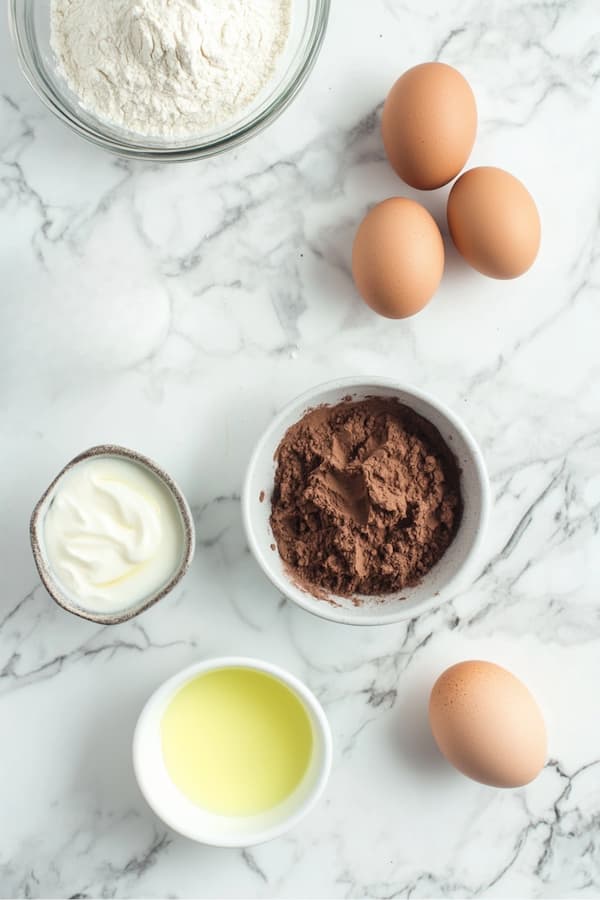
Ingredients
| Ingredient | Amount |
|---|---|
| Whole wheat flour | 1 cup |
| Carob powder | ½ cup |
| Medium eggs | 2 |
| Coconut oil | ¼ cup |
| Water | ¼ cup (adjust as needed) |
| Greek yogurt (plain, unsweetened) | ½ cup |
Carob vs. Chocolate: Never substitute real cocoa powder or chocolate for carob in dog treats. While carob looks similar to chocolate and has a mildly sweet taste, it lacks the theobromine that makes chocolate toxic to dogs. Stick with carob powder specifically labeled as such.
Step-by-Step Cookie Instructions
Step 1: Prepare Your Baking Station
Set your oven to preheat at 350°F (175°C), giving it time to reach the proper temperature while you prepare the dough. Tear off a sheet of parchment paper and use it to line your baking sheet completely, smoothing out any wrinkles. Get out your mixing bowls, measuring cups, and a round cookie cutter (or a drinking glass with a 2-inch rim).
Step 2: Mix the Dry Ingredients
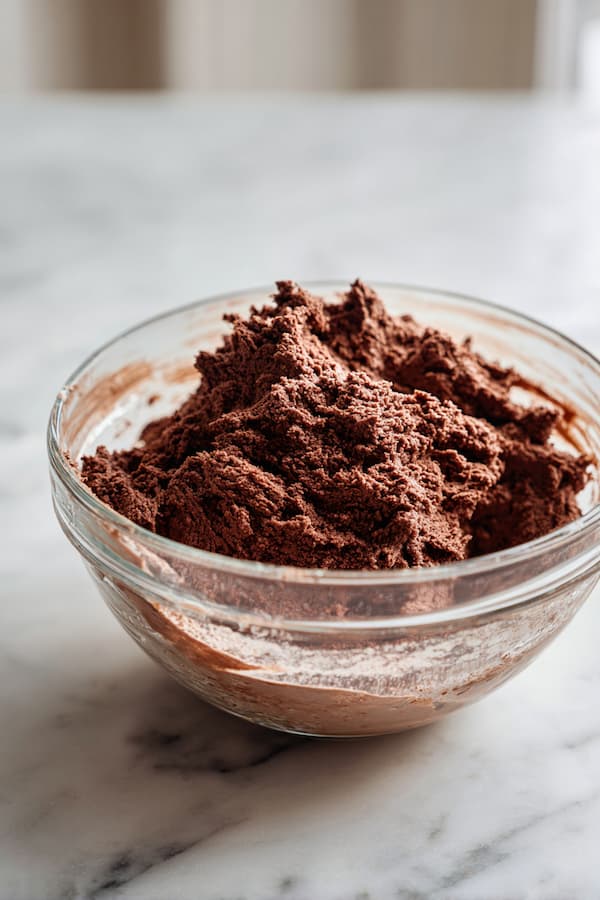
Pour the whole wheat flour into a large mixing bowl. Add the carob powder directly to the flour. Use a whisk or fork to blend these dry ingredients together thoroughly, making sure the carob powder is evenly distributed with no clumps remaining. This creates your dark cookie base.
Step 3: Add Eggs and Coconut Oil
Crack both eggs into the bowl with your dry ingredients. If your coconut oil is solid, melt it in the microwave for 10-15 seconds first, then let it cool slightly before adding. Pour the coconut oil into the bowl. Use a sturdy spoon or spatula to mix everything together, working the wet ingredients into the dry mixture until it starts to clump together.
Step 4: Create the Cookie Dough
Begin adding water gradually—start with 2 tablespoons and stir thoroughly. The dough should start pulling away from the sides of the bowl and forming a cohesive mass. Add more water one tablespoon at a time, mixing after each addition, until the dough holds together without being sticky or crumbly. You want a texture similar to play dough that you can gather into a ball without it falling apart or sticking to your hands. The exact amount of water depends on your flour’s absorbency, so adjust as needed.
Step 5: Roll and Cut Your Cookies
Lightly dust your work surface or a large sheet of parchment paper with flour. Place your dough ball in the center and use a rolling pin to flatten it evenly, aiming for approximately ¼ inch thickness throughout. Roll from the center outward, rotating the dough occasionally to maintain even thickness. Take your round cookie cutter or glass rim and press straight down into the dough, then lift up cleanly. You’ll need an even number of circles since these will become sandwich cookies—aim for at least 20-24 rounds total.
Step 6: Prepare for Baking
Transfer each cut circle carefully to your prepared baking sheet, spacing them about ½ inch apart—they won’t spread much but need a little breathing room. If you’re planning to stamp designs or add decorative touches to the tops, do this now, then place the entire baking sheet in the freezer for 10 minutes. This freezing step helps any stamps or designs hold their shape during baking. If you’re keeping them plain, skip the freezer and proceed directly to baking.
Step 7: Bake Until Firm
Slide the baking sheet onto your oven’s center rack. Set a timer for 15 minutes, but check the cookies at that point—they should feel firm when touched and appear slightly darker around the edges. If they still seem soft, continue baking for another 3-5 minutes. Total baking time typically falls between 15-20 minutes depending on your oven and cookie thickness. Remove the pan from the oven when done and let the cookies sit on the baking sheet for 5 minutes, then carefully move them to a wire cooling rack.
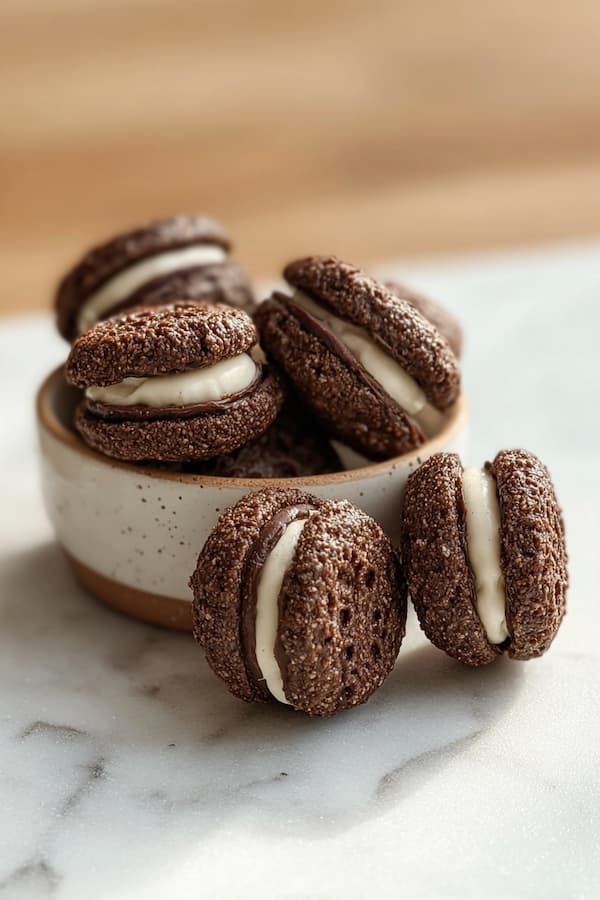
Step 8: Assemble the Sandwich Cookies
Wait until your cookies have cooled completely to room temperature—this usually takes 30-45 minutes. Warm cookies will make the yogurt filling melt and slide off. Once cool, lay out half of your cookies flat-side up. Take the Greek yogurt and spread about 1-2 teaspoons onto each cookie using a butter knife or small spatula, leaving a small border around the edge. Place a second cookie on top, flat side down, and press gently to create a sandwich. The yogurt should spread to the edges without squishing out.
Storage Guidelines
Refrigerator Storage (3-5 Days): These assembled sandwich cookies must be refrigerated due to the yogurt filling. Store them in an airtight container with parchment paper between layers to prevent sticking. The yogurt filling makes them more perishable than regular biscuits, so use them within a few days for best quality.
Freezer Storage (Up to 2 Months): You can freeze assembled sandwich cookies, though the yogurt texture may change slightly upon thawing. Place them in a single layer on a tray and freeze for an hour, then transfer to a freezer bag. Alternatively, freeze the cookies unfilled and assemble fresh sandwiches as needed—this method keeps the yogurt texture perfect.
Make-Ahead Strategy: Bake the cookie circles in advance and store them in an airtight container at room temperature for up to 2 weeks. When you’re ready to serve, assemble sandwiches fresh with yogurt filling—this gives you the convenience of prep-ahead baking with the best texture for serving.
Serving Recommendations by Dog Size
| Dog Weight | Cookie Size | Daily Maximum |
|---|---|---|
| Under 15 lbs | ½ sandwich cookie | 1 piece |
| 15-30 lbs | 1 small sandwich | 1-2 cookies |
| 31-50 lbs | 1 sandwich | 2 cookies |
| 51-70 lbs | 1 sandwich | 2-3 cookies |
| Over 70 lbs | 1-2 sandwiches | 3-4 cookies |
Special Occasion Treats: These sandwich cookies are richer and more substantial than plain biscuits, making them ideal for birthdays, gotcha days, or special celebrations rather than everyday treating.
Remember that these are general recommendations, not veterinary advice. Your dog’s individual needs depend on their activity level, health status, and metabolism.
Treats should make up no more than 10% of your dog’s daily caloric intake. When you’re uncertain about appropriate portions or if your dog has health conditions, always consult your veterinarian for personalized guidance.
Common Questions About Cookies
Can I use a different flour?
Absolutely. Oat flour works wonderfully as a wheat-free alternative, though you might need slightly less water as oat flour behaves differently. Coconut flour is another option but requires significantly less (start with ½ cup) because it’s extremely absorbent.
Can I add peanut butter to the filling?
Definitely! Mix equal parts Greek yogurt and xylitol-free peanut butter for an even richer filling. Just remember to check that your peanut butter contains no artificial sweeteners, especially xylitol, which is toxic to dogs.
Can I use regular yogurt instead of Greek?
Greek yogurt is thicker and holds up better as a filling, but regular plain yogurt works if you strain it first through cheesecloth for 30 minutes to remove excess liquid. Otherwise, the filling might be too runny.
Final Thoughts
So there you have it—the treat that started with cookie envy and ended with Snickers getting her own version of sandwich cookie magic. The best part is watching her trying to figure out the best way to eat them (she’s a “lick the middle first” kind of dog).
These cookies have become our go-to for special occasions, and I love that they look fancy enough for a party but simple enough to whip up on a random Tuesday. From our kitchen to yours—may your pup enjoy these as much as mine does. Happy baking!