
I’ll be honest—I was pretty skeptical the first time someone suggested I make liver treats for Snickers.
The smell, the texture, the whole idea of handling raw liver in my kitchen—none of it sounded particularly appealing on a Sunday afternoon.
But then I made the mistake of buying a bag of freeze-dried liver treats from the pet store, and Snickers reacted like I’d just handed her the canine equivalent of winning the lottery.
She went absolutely bonkers for them—more excited than she’d ever been about any treat, ever.
The problem? Those little bags cost a fortune and disappeared in about three days.
So I swallowed my squeamishness, picked up a pound of liver from the butcher, and decided to make my own.
Turns out, once you get past the initial “I’m handling raw liver” moment, these are possibly the easiest treats you’ll ever make—literally one ingredient, minimal prep, and the kind of high-value reward that makes training sessions feel like magic.
Now I keep a container of homemade liver jerky in the fridge at all times, and Snickers has decided I’m basically the best person who ever lived.
Liver Jerky Dog Treats Recipe
Ingredients
| Ingredient | Amount |
|---|---|
| Beef or calf liver (fresh) | 1 lb |
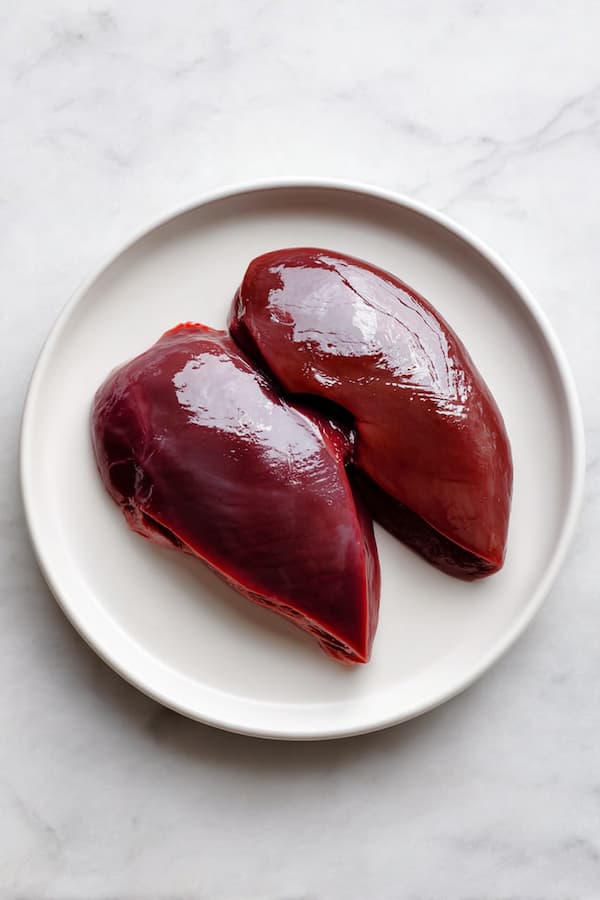
Choosing Your Liver: Beef liver and calf liver both work excellently. Calf liver tends to be slightly milder and more tender, while beef liver has a stronger flavor that some dogs find even more irresistible. Fresh liver works best, but fully thawed frozen liver is acceptable.
Preparation Instructions
Step 1: Prep Your Liver
Remove the liver from its packaging and place it on a clean cutting board. Pat it dry with paper towels to remove excess moisture—this helps it dehydrate more efficiently later. Examine the liver and use a sharp knife to trim away any visible connective tissue, tubes, or parts that look particularly tough or fibrous. These won’t dehydrate well and can be chewy in an unpleasant way.
Step 2: Slice Into Strips
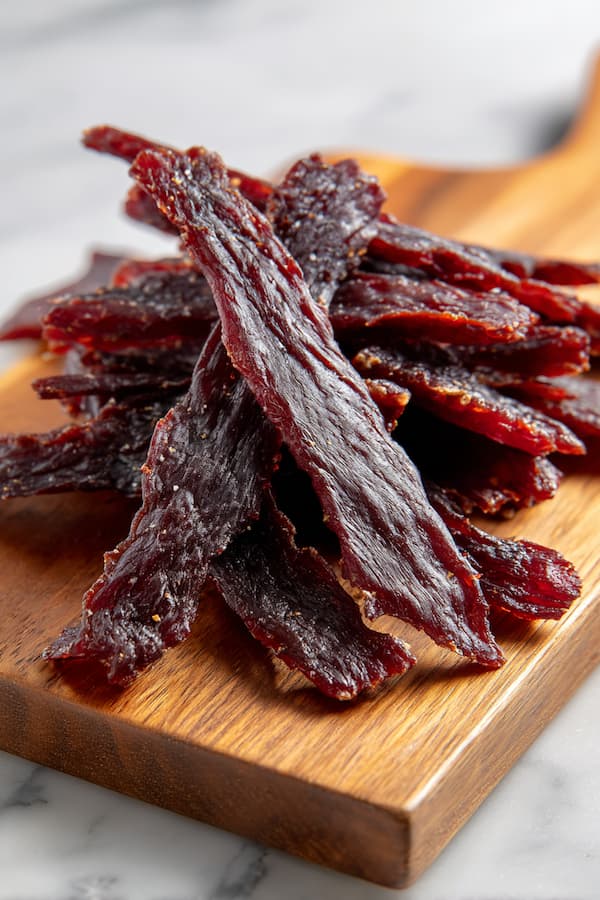
Using a sharp knife, cut the liver into strips. For chewier, pliable jerky that’s good for training rewards, cut strips about ½ inch thick. For crispier, crunchier jerky that lasts longer during chewing, cut strips closer to 1 inch thick. Try to keep your strips relatively uniform in thickness so they dry at the same rate. The width of your strips can vary based on your preference—thinner strips (about 1 inch wide) work well for small dogs, while wider strips (2-3 inches) are better for large dogs or if you plan to break them into smaller pieces later.
Oven Method Instructions
Step 3: Prepare Your Oven and Pan
Preheat your oven to its absolute lowest setting—this is typically somewhere between 170°F and 200°F, depending on your oven model. Some ovens go as low as 150°F, which is ideal if yours has that option. The goal is low and slow dehydration, not cooking at high heat. While the oven preheats, line a cookie sheet or baking pan with parchment paper to prevent sticking and make cleanup easier.
Step 4: Arrange the Liver Strips
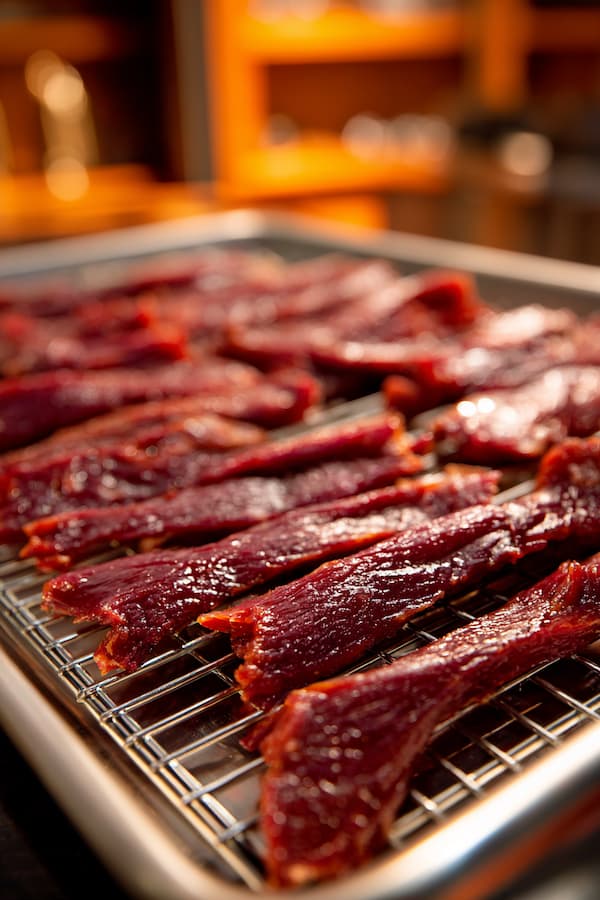
Place your liver strips on the prepared baking sheet in a single layer, making sure none of them overlap or touch each other. Air circulation around each piece is crucial for even drying. If you have more strips than fit on one pan, use multiple pans or work in batches—don’t crowd them or they won’t dry properly.
Step 5: Dehydrate in the Oven
Slide the baking sheet onto the center rack of your preheated oven. For pliable, chewy jerky that’s perfect for breaking into training-sized pieces, bake for approximately 3 hours. For crispy, crunchy jerky that snaps when broken and provides longer-lasting chewing, bake for 5-7 hours. The exact time depends on several factors: the thickness of your strips, the width of your pieces, your oven’s actual temperature, and even the humidity level in your home. Check your jerky at the 3-hour mark and every hour after that to monitor progress.
Step 6: Test for Doneness
To check if your liver jerky is done, remove one piece and let it cool for a minute—hot jerky always seems softer than it actually is. Once cool, bend it or try to break it. Pliable jerky should bend without breaking, feeling leathery and flexible. Crispy jerky should snap cleanly when broken, feeling dry and brittle. If it’s still soft, squishy, or moist in the middle, it needs more time.
Step 7: Final Drying (Optional)
For extremely dry, shelf-stable jerky with maximum crispness, turn off the oven when your jerky reaches the desired texture. Crack the oven door open slightly—prop it with a wooden spoon if needed—and leave the jerky inside as the oven cools completely. This can take several hours but results in the driest possible treats. This step is particularly helpful if you live in a humid climate or want jerky that stays crispy longer.
Dehydrator Method Instructions
Step 3: Prepare Your Dehydrator
If you own a food dehydrator, this is arguably the best method for liver jerky. Dehydrators are specifically designed for this type of low-temperature drying and produce excellent, consistent results. Set your dehydrator to 160°F—this is the ideal temperature for meat products and ensures food safety while dehydrating effectively.
Step 4: Arrange on Dehydrator Trays
Place your liver strips on the dehydrator trays in a single layer, leaving space between each piece for air circulation. Don’t overlap or stack pieces, as this prevents proper drying. Depending on your dehydrator’s size, you might need to work in batches if you’re dehydrating a full pound of liver.
Step 5: Dehydrate Until Done
Insert the trays into your dehydrator and let it run. For pliable jerky, check after 4-5 hours. For crispy jerky, expect 6-8 hours. Dehydrators are more efficient than ovens because they’re designed specifically for this purpose, with better air circulation and more consistent temperature control. Check your jerky periodically, testing a piece for your desired texture. Rotate trays halfway through if your dehydrator doesn’t have a fan or if you notice uneven drying.
Step 6: Cool Completely
Once your jerky reaches the desired texture, remove the trays and let the liver jerky cool completely at room temperature for 20-30 minutes. It will firm up slightly as it cools, so don’t worry if it seems a bit soft initially.
Air Fryer Method Instructions
Step 3: Prepare Your Air Fryer
The air fryer method is the quickest option, though it requires more monitoring and works best for smaller batches. Preheat your air fryer to its lowest setting—typically around 180°F to 200°F. If your air fryer doesn’t go that low, use the lowest available temperature. Some air fryers have a specific “dehydrate” setting, which is perfect for this.
Step 4: Arrange in the Basket
Place liver strips in the air fryer basket in a single layer without overlapping. Don’t crowd the basket—proper air circulation is crucial. Depending on your air fryer’s size, you’ll likely need to work in multiple batches unless you’re only making a small amount.
Step 5: Air Fry with Monitoring
Set the timer for 30 minutes initially. Check the jerky after this time and assess the texture. For pliable jerky, you might need 45-60 minutes total. For crispy jerky, expect 60-90 minutes. The air fryer method is faster than oven or dehydrator because of the concentrated air circulation, but it also requires more frequent checking to prevent over-drying or burning. Shake the basket or flip the pieces every 20-30 minutes for even drying.
Step 6: Test and Continue If Needed
Remove a piece, let it cool briefly, and test the texture. If it needs more time, continue in 10-15 minute increments until you reach your desired consistency. The smaller space and concentrated heat of an air fryer means things can go from perfect to overdone quickly, so stay vigilant.
Storage and Shelf Life
Refrigerator Storage (Up to 5 Days for Pliable, 1 Week for Crispy): Store your completely cooled liver jerky in an airtight container in the refrigerator. Pliable jerky retains more moisture, so it has a shorter refrigerator life—use within 5 days. Crispy jerky lasts longer, up to a week refrigerated.
Freezer Storage (Up to 3 Months): For longer storage, freeze your liver jerky in portions. Place strips in freezer bags with air pressed out, or use airtight containers. Freeze in smaller portions so you can pull out just what you need without repeatedly thawing and refreezing. Frozen liver jerky thaws quickly at room temperature (10-15 minutes) or can be given frozen on hot days.
Serving Recommendations
| Dog Weight | Piece Size | Daily Maximum |
|---|---|---|
| 5-15 lbs | Tiny pieces (pea-sized) | 3-5 pieces |
| 16-30 lbs | Small pieces (dime-sized) | 5-8 pieces |
| 31-50 lbs | Medium pieces (quarter-sized) | 8-10 pieces |
| 51-70 lbs | Large pieces (half-dollar-sized) | 10-12 pieces |
| 71+ lbs | Large pieces | 12-15 pieces |
Training Usage: Liver jerky is incredibly rich and potent, so a little goes a long way. Break it into tiny pieces—you’ll be amazed how motivating even a pea-sized piece can be. This allows you to reward frequently without overfeeding or causing stomach upset.
Not an Everyday Treat: Due to its richness and high vitamin A content, liver should be given in moderation. Use it for special training sessions, difficult behaviors, or as an occasional high-value reward rather than an everyday treat. Too much liver can lead to vitamin A toxicity over time.
Nutritional Benefits
- Exceptional Protein Content
Liver is one of the most protein-dense foods available, providing all essential amino acids dogs need for muscle maintenance, immune function, and cellular repair. It’s pure, bioavailable protein with minimal fat.
- Vitamin A Powerhouse
Liver contains extraordinary amounts of vitamin A, which supports healthy vision, immune system function, skin and coat health, and proper growth and development. This is why moderation is important—vitamin A is fat-soluble and can accumulate.
- Rich in B Vitamins
Liver provides abundant B vitamins, including B12, folate, riboflavin, and niacin. These support energy metabolism, nervous system health, red blood cell production, and overall vitality.
- Iron for Blood Health
The iron in liver is highly bioavailable, meaning dogs absorb it efficiently. Iron supports healthy red blood cells, oxygen transport throughout the body, and overall energy levels.
- Essential Minerals
Liver contains important minerals like zinc, copper, and selenium that support immune function, enzyme production, antioxidant activity, and overall metabolic health.
Frequently Asked Questions
Is liver safe for all dogs?
Most dogs can safely enjoy liver treats in moderation. However, dogs with liver disease, certain metabolic disorders, or vitamin A sensitivity should avoid liver. Always consult your veterinarian if your dog has health conditions.
Can I use chicken liver instead?
Absolutely. Chicken liver works wonderfully and is often cheaper than beef liver. The process is identical. Some dogs actually prefer chicken liver’s milder flavor.
Is the vitamin A content dangerous?
In moderation, no. Problems only arise with excessive, long-term consumption. Following the serving guidelines above keeps liver treats in the safe, beneficial range. Don’t feed liver treats daily or as a primary food source.