
Snickers was sitting at my feet while I ate a banana, doing that thing where he leans his whole body against my leg and stares up with those giant brown eyes. Not begging. Just… existing near the food with maximum emotional pressure.
I broke off a small piece and gave it to him. Gone in half a second. Then the stare again.
That moment is actually what got me into making homemade dog treats in the first place, years ago. And like a lot of people, I started by googling “easy homemade dog treats” — only to find recipes calling for flaxseed meal, coconut flour, bone broth powder, and silicone molds you’d have to order online. One recipe had 14 ingredients. Fourteen. For a dog biscuit.
It wasn’t until I filtered for “3 ingredients or less” that everything clicked. And after making dozens of recipes since then, I keep coming back to the same truth: the best beginner treats are made with stuff already sitting in your kitchen. No baking experience needed. No fancy tools. No specialty ingredients from the health food store.
These are the two recipes I always recommend to people who are just getting started, and honestly, I still make them regularly myself. The first one doesn’t even require an oven. The second one does, but it’s about as complicated as making toast. If you’ve never made anything for your dog before, start here.
Why Homemade Treats Are Worth the 20 Minutes
I’m not going to pretend this is about saving the world. It’s about knowing what your dog is eating and not paying $8 for a bag of treats with an ingredient list that reads like a chemistry textbook.
- You control what goes in. No preservatives, no artificial colors, no mystery “meat by-products.” Just real food.
- Most store-bought treats have way too many ingredients. Flip over your current treat bag and count them. I counted 23 on one of Snickers’ old favorites. He doesn’t need sodium selenite in his snack.
- Dogs don’t care about presentation. They’ll eat an ugly, lopsided homemade treat with the same enthusiasm as a perfectly shaped store-bought one. Probably more, actually.
- It’s cheaper per treat. A batch of either recipe below costs under $3 and makes 20 to 30 treats. That same count from the pet store would run you $7 to $10.
You don’t need to be a baker. You don’t even need to like cooking. If you can stir things in a bowl, you can do this.
Recipe 1: Frozen Peanut Butter Banana Bites (No Bake)
This is the recipe that got me started. No oven, no timer, no way to mess it up. You mash, you mix, you freeze. Done. Snickers goes absolutely still when he hears me pop one of these out of the ice cube tray, like a hunting dog that just spotted something.
I made these for the first time on a random Wednesday night and the whole process took less than 10 minutes of actual work.
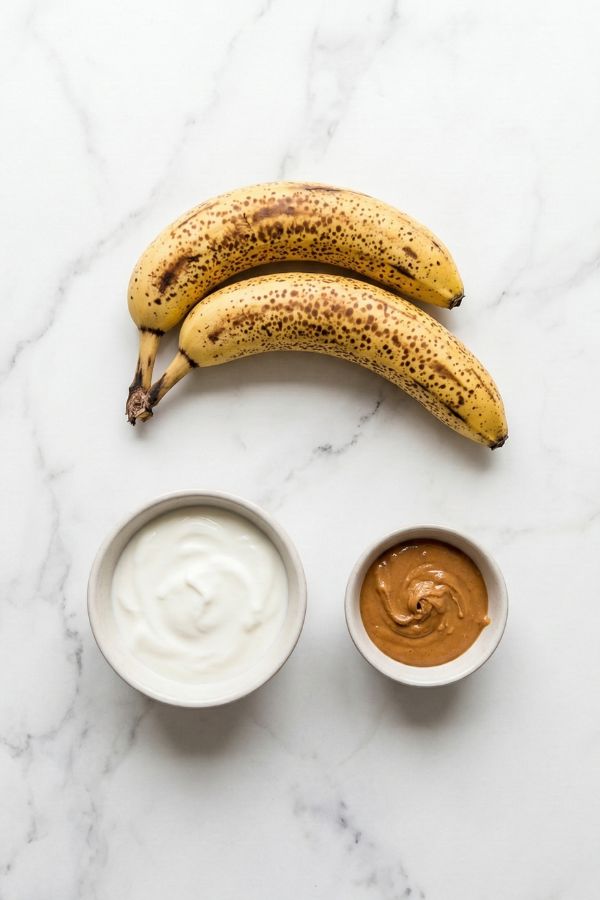
Ingredients
| Ingredient | Amount | Approx. Cost |
|---|---|---|
| Ripe bananas | 2 medium | $0.50 |
| Peanut butter (unsweetened, no xylitol) | 3 tablespoons | $0.45 |
| Plain yogurt (no artificial sweeteners) | 1/4 cup | $0.30 |
| Total | ~$1.25 |
Check your peanut butter label before you use it. Some brands contain xylitol, which is extremely toxic to dogs. The ingredient list should be peanuts and maybe salt. That’s it. If you see “birch sugar” or “xylitol” anywhere on the label, don’t use it.
Steps
Step 1: Mash the Bananas
Peel the bananas into a medium bowl and mash them with a fork until they’re smooth. A few small lumps are fine. Overripe bananas with brown spots work best because they’re softer and sweeter, which means your dog will like them more and you’ll spend less time mashing.
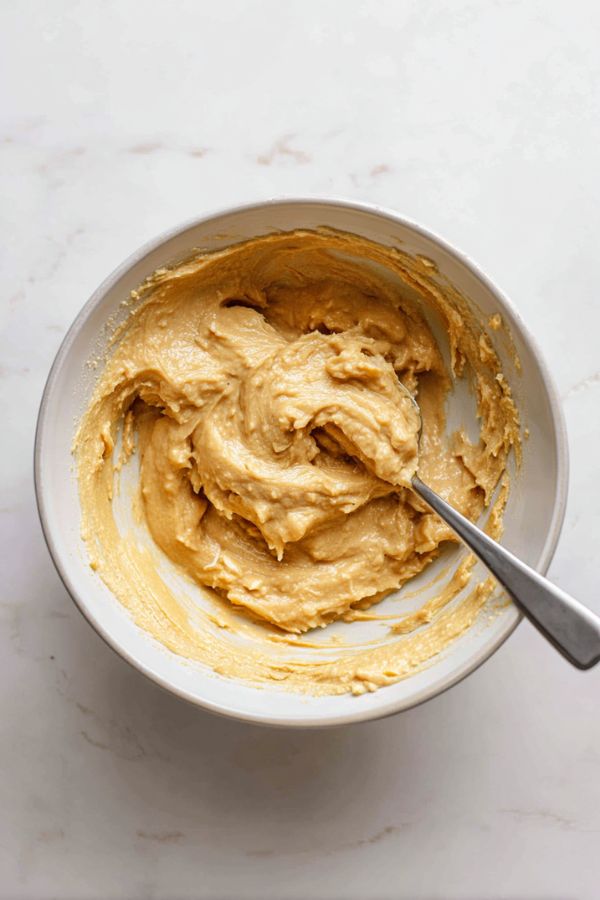
Step 2: Mix in the Peanut Butter and Yogurt
Add the peanut butter and yogurt to the mashed banana. Stir everything together until it’s a thick, creamy paste. It should look like slightly chunky pudding. If the peanut butter is cold and hard to mix, microwave it for about 10 seconds first.
Step 3: Fill Your Molds
Spoon the mixture into a silicone ice cube tray, a mini muffin tin, or just drop small tablespoon-sized blobs onto a parchment-lined plate. Any of these work. I use a regular ice cube tray and it makes about 14 treats per batch.
Don’t have a silicone tray? A regular ice cube tray works too. Just let the treats sit at room temperature for 2 minutes before popping them out, and they’ll slide right out.
Step 4: Freeze
Put the tray in the freezer for at least 3 hours, or overnight. They need to be fully solid before you try to remove them. I usually make a batch before bed and they’re ready by morning.
Step 5: Store and Serve
Pop the treats out and transfer them to a freezer bag or airtight container. Keep them in the freezer. They soften fast at room temperature, so pull one out about 2 minutes before you want to give it to your dog. Just enough time for the edges to thaw slightly.
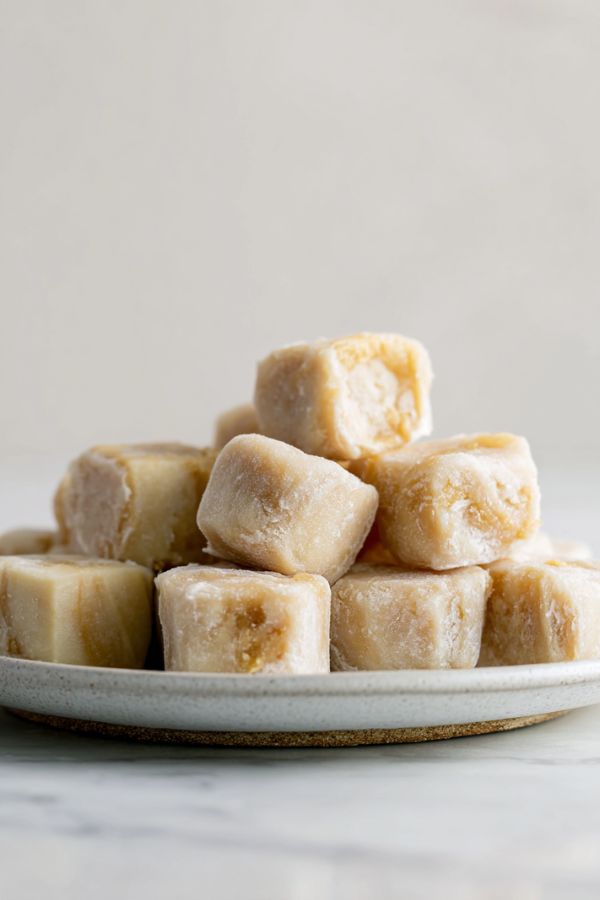
Storage
Freezer only. These last up to 2 months in a sealed bag or container. They don’t work in the fridge because they turn into mush within a day. One batch of 14 treats lasts Snickers about two weeks at one treat per day.
Serving Size
One treat per day for small dogs (under 20 lbs). Two per day for medium dogs (20 to 50 lbs). These are snacks, not meals. Keep them as no more than 10% of your dog’s daily calories.
Recipe 2: Pumpkin Oat Dog Biscuits (Baked)
If you’ve never baked anything in your life, this is a safe first attempt. No yeast, no rising time, no eggs, no butter. You mix dry and wet, roll it out, cut shapes, and bake. The only skill you need is the ability to set an oven to 350. I burned a frozen pizza once. Still nailed these on the first try.
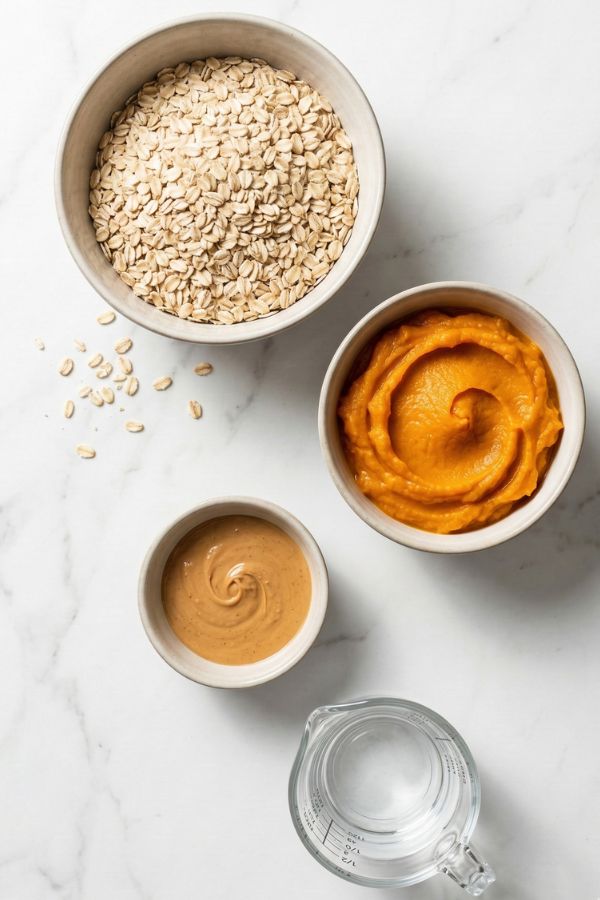
Ingredients
| Ingredient | Amount | Approx. Cost |
|---|---|---|
| Old-fashioned oats | 2 cups | $0.40 |
| Canned pumpkin (pure, not pie filling) | 1/2 cup | $0.90 |
| Peanut butter (unsweetened, no xylitol) | 2 tablespoons | $0.30 |
| Water | 2-4 tablespoons | Free |
| Total | ~$1.60 |
Same peanut butter warning as above. No xylitol. Ever. And double-check that your canned pumpkin says “100% pumpkin” or “pure pumpkin” on the label, not “pumpkin pie mix.”
Steps
Step 1: Blend the Oats Into Flour
Pour the oats into a blender or food processor and pulse until they turn into a rough flour. It doesn’t need to be perfectly fine. A few visible oat flakes are totally okay. Takes about 30 seconds.
No blender? Put the oats in a ziplock bag, press the air out, and crush them with a rolling pin or a heavy jar. Works just as well, takes a little longer (and yes, I’ve done this).
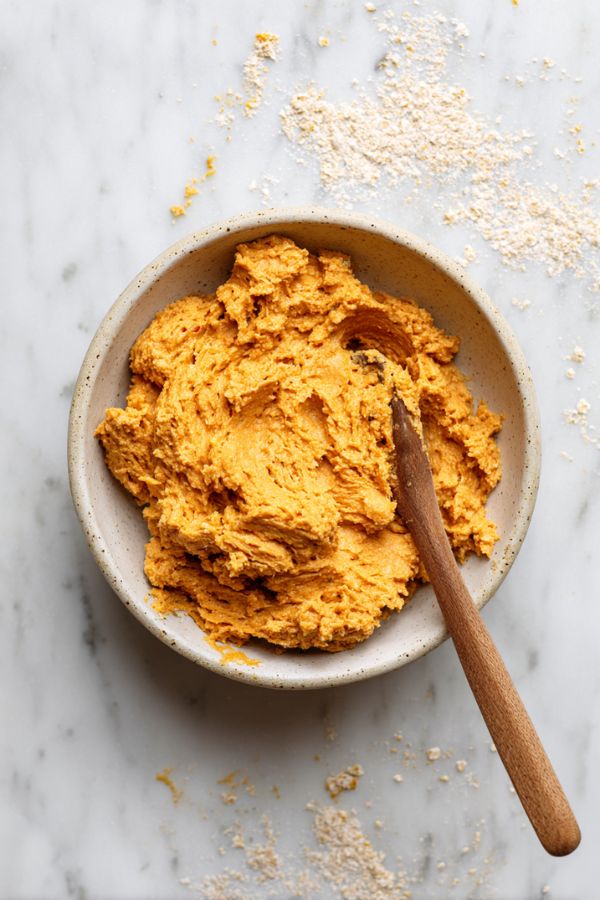
Step 2: Mix the Dough
In a medium bowl, combine the oat flour, pumpkin, and peanut butter. Stir with a spoon or spatula until it comes together into a dough. It’ll be thick and a little sticky. If it’s too dry and crumbly, add water one tablespoon at a time until it holds together. You want it to feel like Play-Doh, not cookie dough.
Step 3: Preheat and Prep
Set your oven to 350 degrees F (175 C). Line a baking sheet with parchment paper. No parchment paper? A light coat of cooking spray works too.
Step 4: Roll and Cut
Lightly sprinkle some oat flour on your counter or cutting board. Press the dough out with your hands or a rolling pin until it’s about 1/4 inch thick. Cut shapes with a cookie cutter, a drinking glass, or just a knife. I use the rim of a cup to make circles. Snickers doesn’t care about bone-shaped treats. He just wants to eat them.
Place the cut shapes on the baking sheet. They don’t spread, so you can put them pretty close together.
Step 5: Bake
Bake at 350 F for 20 to 25 minutes until the edges are dry and slightly golden. They’ll feel soft when you take them out. That’s normal. They harden as they cool. If you want crunchier treats, turn the oven off and leave them inside with the door cracked for another 20 minutes.
Step 6: Cool Completely
Let the biscuits cool on the baking sheet for at least 30 minutes. They need to firm up before you handle them. Try to break one in half. If it snaps cleanly, they’re done. If it bends, give them more time.

Storage
Airtight container at room temperature for up to 10 days. Fridge for up to 3 weeks. Freezer for up to 3 months. This batch makes roughly 24 to 30 biscuits depending on the size of your cutter. I keep a week’s worth on the counter and freeze the rest.
Serving Size
One to two biscuits per day for small dogs. These are low-calorie compared to most store-bought treats, but they still count toward your dog’s daily intake. Snickers gets one after his morning walk and occasionally one after dinner if he gives me the look. You know the look.
What If I Mess Something Up?
Honestly, it’s pretty hard to ruin either of these. But here are the most common beginner mistakes and how to avoid them.
- Biscuits came out soft and bendy. They probably needed 5 more minutes in the oven, or you didn’t let them cool long enough. Pop them back in at 325 F for another 8 to 10 minutes.
- Frozen treats are rock hard and my dog can’t eat them. Let them sit at room temperature for 3 to 5 minutes before serving. Small dogs especially need that thaw time.
- Dough is too sticky to roll out. Add more oat flour, a tablespoon at a time, until it stops sticking to your hands. Dust your surface generously too.
- Dough is too dry and crumbly. Add water, one tablespoon at a time, and mix thoroughly between additions. The pumpkin should provide most of the moisture, but canned pumpkin brands vary in water content.
None of these are disasters. Even the ugly batches taste exactly the same to your dog.
Ingredients to Always Avoid in Dog Treats
Quick reference so you don’t have to google it every time. These are toxic or harmful to dogs.
- Xylitol (also labeled as “birch sugar”). Found in some peanut butters, sugar-free products, and gum. Even small amounts can be fatal.
- Chocolate in any form. Dark, milk, white, cocoa powder. All of it.
- Raisins and grapes. Can cause kidney failure.
- Onion and garlic powder. Sometimes hidden in seasoning blends.
- Macadamia nuts. Cause weakness, vomiting, and tremors.
- Nutmeg. Toxic in more than tiny amounts. This is why pumpkin pie filling is a no.
Stick to plain, single-ingredient foods and you’ll be fine. When in doubt, leave it out.
FAQ
Do I need special dog treat cookie cutters?
No. A drinking glass, a jar lid, or a knife works perfectly. I made my first three batches using the top of a mason jar. Snickers didn’t complain once about the shape.
Can I use almond butter instead of peanut butter?
Plain almond butter with no added sweeteners is safe for most dogs. Just use the same amount. It’s usually more expensive than peanut butter though, so I stick with PB.
How do I know my dog isn’t allergic to something?
Start with a single treat and wait 24 hours. Watch for itching, swelling, vomiting, or diarrhea. If nothing happens, you’re good. If your dog has known food sensitivities, check with your vet before introducing new ingredients. Snickers has no allergies, but I still introduced pumpkin slowly the first time just to be safe.
Can I make these for a puppy?
Yes, but cut the portions in half. Puppies have smaller stomachs and different calorie needs. The frozen banana bites are especially good for teething puppies because the cold soothes their gums. Just make them smaller.
I’m a dedicated dog lover and happy kitchen experimenter, but I’m not a veterinarian or animal nutritionist. If your dog has specific dietary needs or health conditions, check with your vet before introducing new treats.
Happy treating!