
Saturday mornings in our house have a sacred ritual – I make cinnamon rolls from scratch, the whole house fills with that warm, sweet-spicy aroma, and everyone gravitates to the kitchen like they’re under a spell.
Including Snickers, who parks himself right at my feet and gives me those eyes that say “surely one of those is for me, right?”
And every single time, I have to break his heart with “sorry boy, these have way too much sugar for you.”
But a few weeks ago, I had a thought while I was rolling out dough: what if I made her a dog-safe version?
Not the sugar-loaded, frosting-covered kind we eat, but little cinnamon swirl treats that capture that same cozy, fresh-baked feeling without any of the ingredients he can’t have.
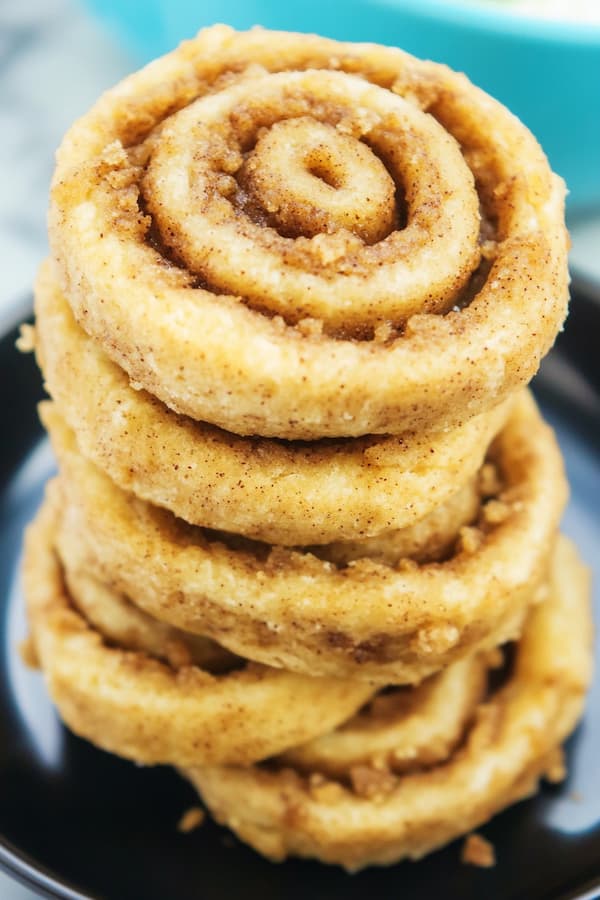
Turns out, making miniature cinnamon rolls for your dog is not only possible, it’s actually easier than making the real thing, and watching him carry one around the house like a prized treasure before finally eating it might be even better than eating my own.
Cinnamon Roll Dog Treats Recipe
Ingredients

| Ingredient | Amount |
|---|---|
| Whole wheat flour | 2 cups |
| Large egg | 1 |
| Milk | ½ cup |
| Rolled oats (finely pulsed) | ½ cup |
| Baking powder | 1 teaspoon |
| Coconut oil (melted) | ¼ cup |
| Honey | 2 tablespoons |
| Ground cinnamon | 1 teaspoon |
Preparing the Oats: Pulse your rolled oats in a food processor or blender 8-10 times until they’re broken down into smaller, coarse pieces, not quite flour, but finer than whole oats.
Step-by-Step Instructions


Step 1: Prepare Your Baking Setup
Set your oven to preheat at 350°F (175°C). Pull out a cookie sheet and line it completely with parchment paper, smoothing out any wrinkles or folds. Get out two mixing bowls (one large, one small).
Step 2: Mix Your Dry Ingredients
In your large mixing bowl, measure and add the whole wheat flour and baking powder. Use a whisk or fork to blend these dry ingredients together thoroughly, making sure the baking powder distributes evenly with no clumps.
Step 3: Combine the Wet Ingredients
Take your small bowl and crack the egg into it. Add the milk and melted coconut oil (if your coconut oil is solid, microwave it for 10-15 seconds until liquid, then let it cool slightly). Use a fork or small whisk to beat these ingredients together until they’re completely combined and the mixture looks uniform and slightly frothy.
Step 4: Create the Dough
Pour your wet ingredient mixture into the large bowl containing the dry ingredients. Using a wooden spoon or spatula, stir everything together with gentle but firm motions. Mix just until the ingredients come together into a soft, cohesive dough—don’t overmix or the treats will become tough. The dough should be soft, slightly tacky, and pliable, similar to biscuit dough.
Step 5: Roll Out the Dough
Lightly dust your clean work surface with a sprinkle of flour to prevent sticking. Place your dough ball in the center and dust your hands lightly with flour as well. Using your hands or a rolling pin, pat and roll the dough into a rectangular shape. Aim for dimensions of approximately 9 inches wide by 12 inches long, with an even thickness of about ¼ inch throughout. Take your time to keep the thickness consistent—this ensures even baking and uniform spirals.
Step 6: Add the Filling
Take your honey and drizzle it evenly across the entire surface of the dough rectangle, using a spoon or your fingers to spread it into a thin, uniform layer that reaches almost to the edges. Sprinkle the ground cinnamon evenly over the honey-covered surface. Finally, scatter your pulsed oats across the top, distributing them as evenly as possible. The honey acts as glue to hold the cinnamon and oats in place during rolling.
Step 7: Roll Up the Dough
Starting at one of the long edges (the 12-inch side), begin rolling the dough toward the opposite long edge, working carefully to keep the roll tight and even. Use both hands to maintain consistent pressure and keep the spiral shape uniform. Once you reach the end, pinch the seam firmly to seal it closed. You should now have a log approximately 12 inches long.
Step 8: Slice Into Individual Rolls
Using a sharp knife, cut the log into slices approximately ½ inch thick—you should get around 20-24 rolls depending on how precisely you slice. If the knife starts sticking to the dough and dragging, dip the blade in water and wipe it clean between cuts. Place each slice cut-side down on your prepared baking sheet, spacing them about an inch apart. The spiral pattern should be visible and beautiful.
Step 9: Bake to Golden Perfection
Slide the baking sheet onto the center rack of your preheated oven and set a timer for 12 minutes. Check them at this point—the rolls should look lightly golden around the edges and feel firm to the touch. If they still seem pale or soft, continue baking for another 2-3 minutes, checking frequently. Total baking time typically falls between 12-15 minutes.Let them cool on the baking sheet for 5 minutes, then transfer to a wire cooling rack to cool completely before serving.
Storage and Freshness
Room Temperature Storage (1 Week): Once completely cooled, store these treats in an airtight container at room temperature for up to a week. The honey adds moisture that helps keep them from drying out too quickly.
Refrigerator Storage (2-3 Weeks): For longer freshness, keep them in a sealed container in the refrigerator. The cool environment extends their shelf life significantly. Let them sit out for 5-10 minutes before serving to take the chill off.
Freezer Storage (Up to 3 Months): These freeze beautifully for long-term storage. Arrange cooled rolls in a single layer in a freezer bag with air pressed out, or stack them with parchment paper between layers. Thaw at room temperature for 15-20 minutes before serving, or give frozen if your dog enjoys cold, crunchy treats.
Serving Recommendations
| Dog Weight | Roll Size | Daily Maximum |
|---|---|---|
| 5-15 lbs | ½ roll | 1-2 pieces |
| 16-30 lbs | 1 small roll | 2-3 rolls |
| 31-50 lbs | 1 roll | 3-4 rolls |
| 51-70 lbs | 1-2 rolls | 4-5 rolls |
| 71+ lbs | 2 rolls | 5-6 rolls |
These serving sizes are general guidelines, not veterinary recommendations. Individual dogs have unique needs based on their breed, age, activity level, health status, and metabolism.
Treats should comprise no more than 10% of your dog’s daily caloric intake. Monitor your dog’s weight and body condition regularly, adjusting treat portions as needed. For dogs with health conditions, dietary restrictions, or special needs, always consult your veterinarian before introducing new treats.
Health Benefits
- Anti-Inflammatory Cinnamon
Cinnamon contains compounds with natural anti-inflammatory properties that may support joint health and reduce inflammation throughout the body. It’s also been studied for potential blood sugar regulation benefits.
- Digestive Support from Whole Wheat
Whole wheat flour provides dietary fiber that promotes healthy digestion, supports beneficial gut bacteria, and helps dogs feel satisfied after eating.
- Protein from Eggs and Milk
Both eggs and milk contribute high-quality protein that supports muscle maintenance, immune function, and overall cellular health throughout your dog’s body.
Recipe Substitutes
Grain-Free Alternative: Replace the whole wheat flour with oat flour (2 cups) or a combination of almond flour and coconut flour for a grain-free version. Texture will vary slightly but will still be delicious.
Dairy-Free Option: Substitute the milk with unsweetened almond milk, oat milk, or even water if your dog has lactose sensitivity. Most dogs handle small amounts of milk fine, but alternatives work perfectly.
Frequently Asked Questions
Is cinnamon safe for dogs?
Yes, cinnamon in small amounts is safe and even beneficial for dogs. This recipe uses a moderate amount that provides flavor and health benefits without any risk. Avoid cinnamon essential oil, which is concentrated and can cause irritation.
Can I use all-purpose flour instead?
Absolutely. All-purpose flour works as a one-to-one substitute, though whole wheat provides more fiber and nutrients. Your dog won’t complain either way.
Can I skip the honey?
You can, though honey adds moisture, natural sweetness, and helps the filling stick. If you omit it, the rolls will be slightly drier and less sweet, but still tasty. You could substitute mashed banana (2 tablespoons) for moisture.
How do I know when they’re done baking?
Look for light golden color around the edges and a firm texture when gently touched. If they still seem soft and pale after 12 minutes, give them a few more minutes. They’ll firm up more as they cool.
My dog has wheat allergies—what can I use?
Final Thoughts
So now Saturday morning cinnamon rolls have become a family-wide tradition (the humans get their frosted version, and Snickers gets his honey-cinnamon spirals that he treats like they’re made of gold).
Honestly, I’m not sure who’s more excited about the tradition at this point. There’s something really special about including your dog in those cozy weekend rituals, even if their version is a bit different from yours.
These little rolls have become our way of saying “you’re part of this too,” and judging by the way he prances around with one before finally settling down to eat it, the message is definitely getting through. Happy baking!