
One crisp fall afternoon, as I scooped pumpkin for a pie, my dog, Snickers, hovered nearby, his nose twitching with curiosity.
Inspired to share the seasonal bounty, I mixed up these Pumpkin & Oatmeal Dog Snack Sticks—a wholesome treat blending creamy pumpkin with hearty oats.
Perfect for rewarding good behavior or spoiling your pup, these sticks are simple to make, digestible, and packed with feel-good ingredients.
Whether your dog loves a firm crunch or a softer bite, this recipe delivers tail-wagging delight. Let’s bake some autumn-inspired treats together!
Why You’ll Love These Snack Sticks
- Combines pumpkin and oats for a fiber-rich, digestible treat.
- Minimal ingredients for a wholesome, homemade reward.
- Customizable texture—crisp or soft—to suit any dog’s preference.
Homemade Pumpkin & Oatmeal Dog Snack Sticks Recipe

This recipe creates a batch of crunchy or soft snack sticks, perfect for dogs of all sizes.
Below is the ingredient table followed by detailed steps for a perfectly baked treat.
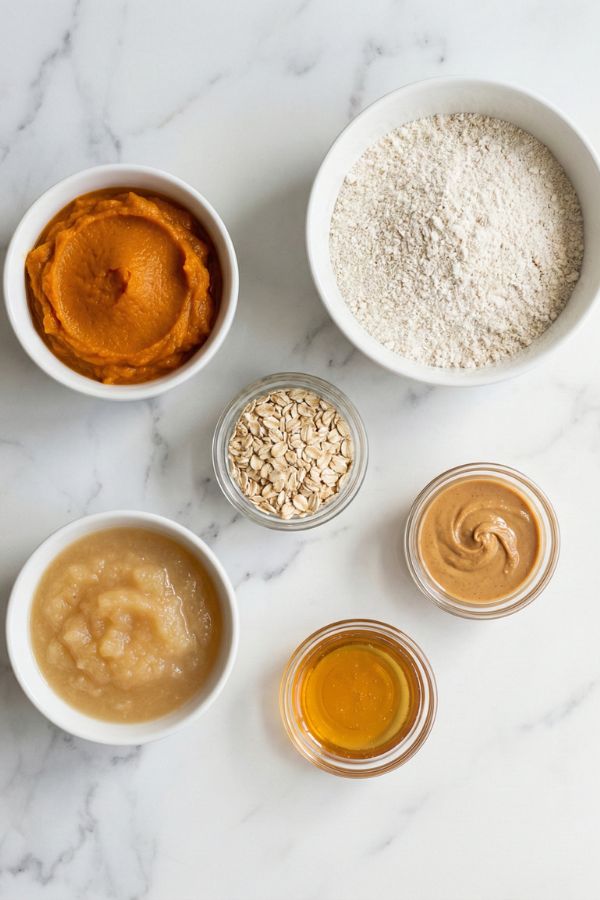
| Ingredient | Description |
| 1 cup pure pumpkin puree | Fiber and vitamins for digestion and health. |
| 2 cups oat flour + 2 tbsp oats | Hearty base for texture and gentle carbs. |
| ½ cup unsweetened applesauce | Natural sweetness and moisture for binding. |
| 1 tbsp peanut butter, xylitol-free | Protein and flavor—safe for dogs. |
| ½ tsp honey | Subtle sweetness for palatability—minimal amount. |
Step 1: Preheat the Oven
Set your oven to 325°F (160°C) and allow it to fully preheat for at least 10 minutes. While waiting, line a baking sheet with parchment paper to prevent sticking and make cleanup effortless.
Step 2: Mix the Wet Ingredients
In a large mixing bowl, combine your wet ingredients. Stir thoroughly with a spoon or whisk for 1-2 minutes until the mixture is completely smooth and creamy with no peanut butter clumps remaining.
Step 3: Add the Dry Ingredients
Add 2 cups oat flour and 2 tbsp whole oats to your wet mixture. The oat flour serves as the base and provides a gentle, easily digestible grain, while the whole oats add texture and additional fiber. Stir with a sturdy spoon or use your hands for 2-3 minutes until a soft, slightly sticky dough forms. The dough should come together into a cohesive ball. If it feels too wet or sticky to handle, sprinkle in 1-2 tablespoons of extra oat flour gradually. The perfect consistency should hold together without being crumbly or falling apart.
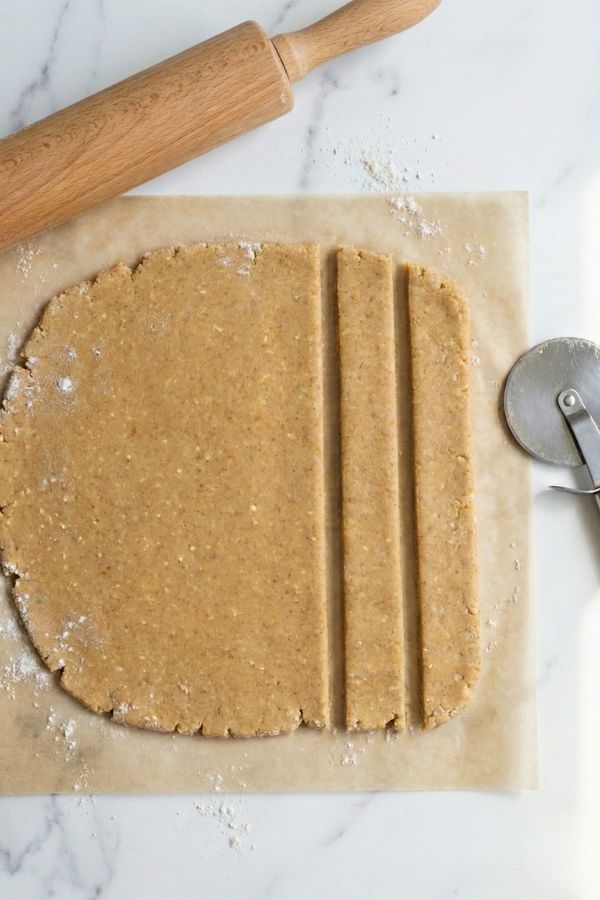
Step 4: Roll and Shape the Dough
Lightly dust a clean countertop or cutting board with oat flour, or place your dough between two sheets of parchment paper to prevent sticking. Using a rolling pin, roll the dough out to a consistent ½-inch thickness—use a ruler to check for uniformity, as this ensures all treats bake at the same rate. Cut the dough into strips measuring approximately 1 inch wide by 3-4 inches long using a sharp knife or pizza cutter. Try to keep sizes uniform so smaller pieces don’t burn while larger ones are still baking. You can re-roll scraps to minimize waste.
Step 5: Arrange for Baking
Carefully transfer the cut strips to your prepared baking sheet, spacing them about ½ inch apart. These treats won’t spread much during baking, so they don’t need excessive room between them. If any edges look rough or uneven, gently press them with your fingertips to smooth them out—this helps prevent sharp edges and creates a more professional appearance.
Step 6: Bake the Sticks
Place the baking sheet in your preheated oven and bake at 325°F for 30-35 minutes. The treats are done when they feel firm to the touch and have turned lightly golden brown around the edges. They’ll still be somewhat soft when hot but will firm up as they cool. The low temperature ensures the treats dry out gradually without burning, which is essential for creating a shelf-stable treat.
Step 7: Dehydrate for Extra Crispiness
For dogs who prefer an extra-crunchy texture, transfer the cooled baked treats to your dehydrator trays in a single layer. Set the dehydrator to 175°F and run it for approximately 3 hours, checking occasionally. This dehydration step removes additional moisture, creating perfectly crispy treats that many dogs—like my Snickers—absolutely love!
Step 8: Cool and Serve
Let sticks cool completely for 20-25 minutes. Serve 1-2 sticks daily—half or one for small dogs, up to two for larger breeds—keeping within 10% of daily calories.

Storage and Serving
Store snack sticks in an airtight container at room temperature for up to 1 week. Use a glass jar or sealed bag to maintain crunch.
For longer storage, refrigerate for 2 weeks or freeze for 3 months. Thaw at room temperature before serving.
Serve as a training reward or occasional snack—1-2 sticks daily, depending on size, to avoid overfeeding.
Feeding Guidelines
These treats are a supplement, not a meal replacement, for occasional use (2-3 times weekly).
Introduce slowly—start with half a stick—to ensure your dog tolerates pumpkin, oats, or peanut butter.
Small dogs may need smaller pieces to avoid choking or digestive upset.
Consult a vet if your dog has allergies (e.g., to grains or peanuts) or conditions like pancreatitis, as even small amounts of fat can trigger issues.
Troubleshooting Common Baking Issues
First time baking dog treats? Don’t worry if things aren’t perfect—Snickers doesn’t judge, and neither do we!
Here’s how to fix common hiccups:
- Dough too sticky: Add 1 tbsp oat flour at a time until workable. Don’t overdo it to avoid dryness.
- Treats too soft: Ensure ½-inch thickness and complete the drying step. Bake 5 minutes longer if needed.
- Uneven baking: Rotate the baking sheet halfway through. Cut strips uniformly for consistent results.
- Treats crumble: May be overbaked. Reduce time by 2-3 minutes next batch.
Store soft treats in the fridge to prevent spoilage. Drop a comment below if you hit a snag—we’ll help you nail the perfect batch!
Pairing Treats with a Balanced Diet for Optimal Health
These snack sticks are a tasty reward, but they’re just one part of your pup’s healthy diet.
Treats should make up no more than 10% of daily calories. For a 20-lb dog eating 300-400 calories daily, 1-2 small treats (20-30 calories) are ideal.
Pair them with:
- High-quality kibble or wet food rich in protein, like chicken or salmon.
- Dog-safe veggies, like steamed green beans, for low-calorie crunch.
Check with your vet for portion control, especially for dogs managing weight or health conditions.
A balanced diet keeps your pup thriving, with these treats as a delightful bonus!
Benefits of the Ingredients
- Pumpkin: Fiber and vitamins A and C for digestion and immunity.
- Oats: Gentle carbs and fiber for energy and gut health.
- Applesauce: Natural sweetness and moisture, low in calories.
- Peanut Butter: Protein and healthy fats for flavor and satiety.
- Honey: Minimal sweetness with antioxidant traces—sparingly used.
FAQs
Are these safe for all dogs?
Yes, if no allergies—check for oat or peanut sensitivity; start small.
Why are my sticks soft?
Check dough thickness—too thick or underbaked; ensure drying step for crunch.
Can I skip honey?
Yes, it’s optional—flavor remains appealing without it.
Conclusion
These Homemade Pumpkin & Oatmeal Dog Snack Sticks bring wholesome crunch to your dog’s day.
I’ve loved watching Snickers’ eyes light up as he munches these treats, and I hope your pup feels that same joy.
Bake a batch for a rewarding moment, and savor the simple pleasure of a homemade treat—here’s to happy snacking and wagging tails!