Snickers came inside after a backyard sprinkler session last July and shook his head so hard his ears made a slapping sound against his skull. Then he did it again. And again. By that evening he was scratching at his left ear with his back paw every few minutes.
I lifted the ear flap and there it was. A reddish-brown gunk with a smell that I can only describe as stale corn chips mixed with something sweet. Not pleasant. I called our vet the next morning and she confirmed what I’d already suspected. Yeast infection, likely from moisture trapped in the ear canal after getting wet.
The visit cost me $140 for the exam and medication. The bottle of ear cleaning solution she sent me home with? Twelve dollars. She told me if I’d been cleaning his ears after he got wet, we probably could have avoided the whole thing.
That was the wake-up call. I’ve been cleaning Snickers’ ears regularly ever since, and we haven’t had another infection. Here’s exactly how to do it, including the mistakes I made so you don’t have to.
Quick Guide: Dog Ear Cleaning at Home
| What You Need | Details |
|---|---|
| Ear cleaning solution | Vet-formulated with drying agents. Not water, peroxide, or alcohol. |
| Cotton balls or gauze | Never Q-tips or cotton swabs. |
| Treats | High-value, for building positive association |
| Time | 2-3 minutes per ear |
| Frequency | Every 1-4 weeks depending on ear type |
| Depth limit | One knuckle deep. No further. |
If your dog’s ears smell bad, have dark discharge, or cause them pain when touched, skip the home cleaning and see your vet first.
What You’ll Need (And What to Avoid)
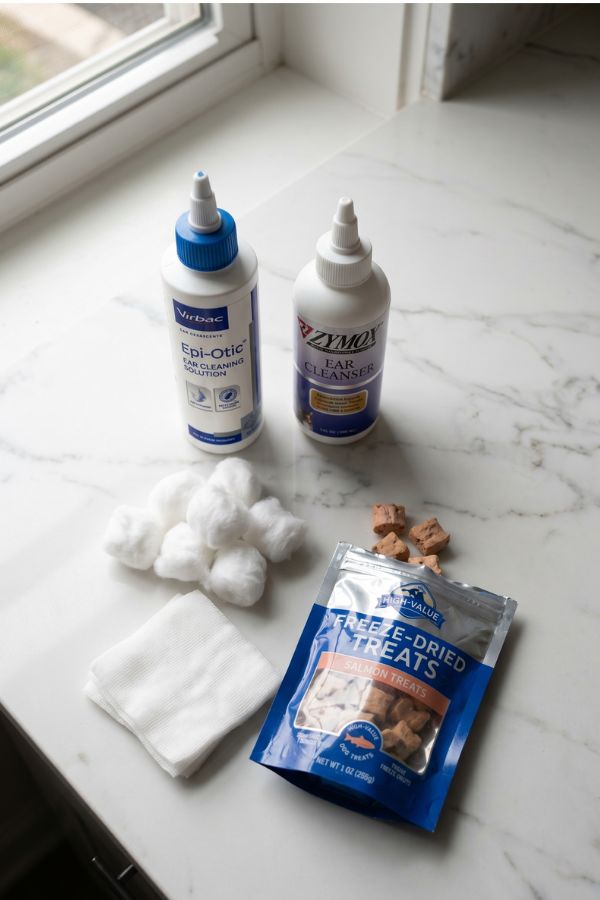
Use: A vet-formulated ear cleaning solution. Look for products that contain drying agents along with ingredients like salicylic acid (breaks down wax), boric acid (mild antifungal), or acetic acid (discourages bacteria). Virbac Epi-Otic, Zymox Ear Cleanser, and Dechra TrizEDTA are all solid, widely available picks. No prescription needed.
Use: Cotton balls or gauze pads. These are what you’ll use to wipe out the loosened debris. Gentle, absorbent, and safe.
Use: Treats. Especially during the first several sessions. You want your dog to associate ear cleaning with something good.
Now for the hard no’s.
Never use Q-tips or cotton swabs. This is the biggest one. The L-shaped ear canal means Q-tips push debris deeper into the canal instead of pulling it out. There’s also a real risk of damaging the canal lining or even the eardrum.
Never use hydrogen peroxide. It irritates the delicate ear canal tissue, and if the eardrum happens to be ruptured (which you can’t see at home), it can damage the middle ear.
Never use rubbing alcohol. Burns on contact with any inflamed tissue. Same middle ear risk as peroxide.
Never use plain water. It doesn’t dissolve waxy buildup, and it doesn’t evaporate properly from the curved canal. You’ll leave moisture behind, which is exactly what causes infections in the first place.
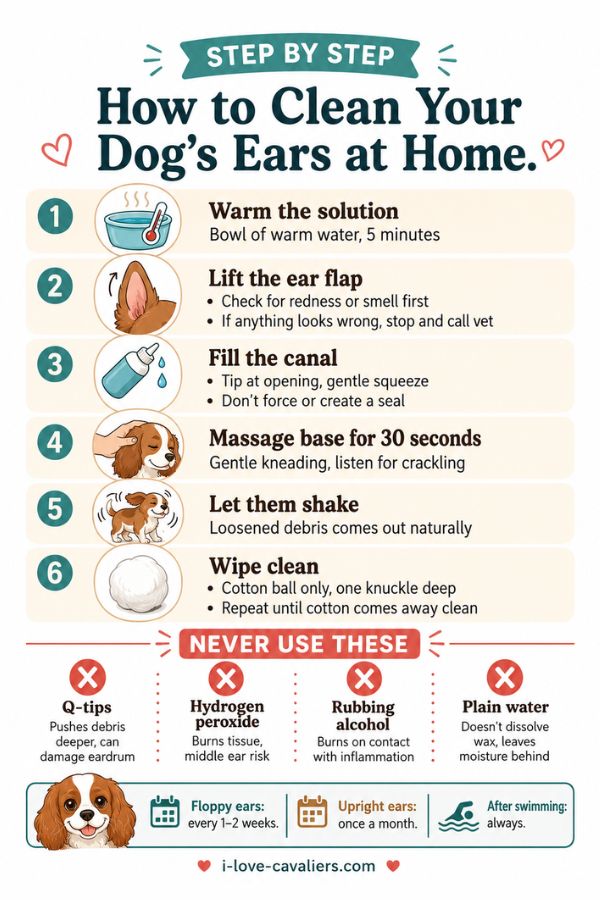
Step-by-Step: How to Clean Your Dog’s Ears
The whole process takes about two to three minutes per ear once you’ve got the hang of it. Here’s how.
- Get your dog comfortable. Sit them between your legs or next to you on the couch. If your dog tends to squirm, backing them into a corner so they can’t reverse away from you helps. Have treats within reach.
- Warm the solution first. This one’s a game changer (and yes, I’ve made this mistake). Cold solution hitting the ear canal is the number one reason dogs flinch and fight. Set the bottle in a bowl of warm water for about five minutes before you start. Body temperature is what you’re after.
- Lift the ear flap. Hold it up gently to expose the ear canal opening. Take a quick look inside. If you see redness, swelling, dark discharge, or your dog flinches when you touch the ear, stop and call your vet instead.
- Fill the ear canal with solution. Rest the tip of the bottle at the canal opening without creating a tight seal. Squeeze gently until the canal is full. You’ll hear a squishing sound. Don’t shove the tip in or squeeze hard, as forcing solution under pressure can damage the eardrum.
- Massage the base of the ear for 30 seconds. The base is the soft, slightly squishy area right below the ear opening. Use your thumb and forefinger and make a gentle kneading motion. You’ll hear a wet crackling sound as the solution breaks up debris inside the canal. This is the part that does most of the work.
- Let your dog shake. Step back. They’re going to shake their head, and that’s exactly what you want. The shaking moves loosened debris and excess solution up and out of the canal. This is why you do this on a surface you don’t mind getting a little messy.
- Wipe the ear. Using a cotton ball or gauze, gently wipe the inner ear flap and the upper portion of the ear canal. Only go about one knuckle deep. Work from inside outward. Repeat with fresh cotton balls until they come away mostly clean.
- Reward immediately. Treats, praise, whatever your dog loves. Every single time.
Repeat on the other ear. That’s it. The first time will be slow and a little awkward. By the fourth or fifth time, you’ll be done in under five minutes total.
Signs Your Dog Has an Ear Infection
Knowing what a healthy ear looks like makes it much easier to spot when something’s wrong.
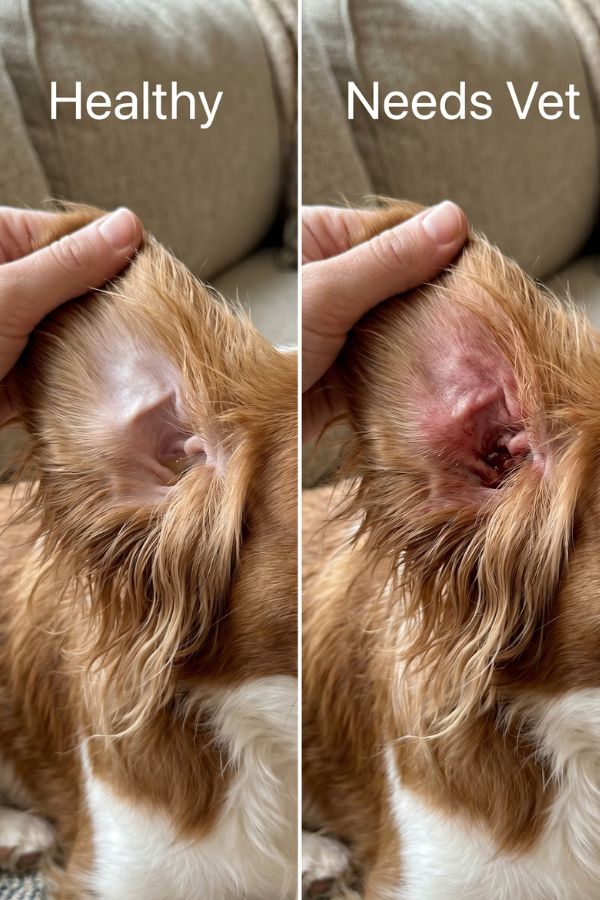
Healthy ears: The inside of the ear flap is pale pink. Any visible wax is light yellow or transparent, soft in texture, and has little to no smell. That’s normal. Leave it alone.
Signs of infection:
| What You See or Smell | Likely Cause |
|---|---|
| Dark reddish-brown gunk, musty or sweet smell | Yeast infection (Malassezia) |
| Yellow-green discharge | Bacterial infection |
| Black, crusty debris (like coffee grounds) | Ear mites |
| Any pus | Vet immediately |
Behavioral signs to watch for:
- Repeated head shaking (not just an occasional shake)
- Scratching at one or both ears constantly
- Rubbing their ear against the floor or furniture
- Tilting their head to one side
- Whimpering or pulling away when you touch the ear
- Loss of balance or walking in circles (this is serious, go to the vet now)
That “corn chip” or “Frito” smell owners talk about? That’s yeast. It’s the most common type of dog ear infection and it’s exactly what Snickers had. Distinctive once you know what you’re smelling.
When to Clean at Home vs. When to See the Vet
This distinction matters. Cleaning an already-infected ear at home without knowing what you’re dealing with can make things worse.
Clean at home when:
- You see a small amount of light brown wax
- There’s no unusual smell
- Your dog isn’t showing any pain or discomfort
- After a bath or swim, to dry out the canal
See your vet when:
- Discharge is dark, colored, or thick
- There’s any noticeable smell (sweet, yeasty, foul)
- Your dog flinches or yelps when the ear is touched
- The ear canal looks red or swollen
- Symptoms haven’t improved after a couple of days
- Your dog has a persistent head tilt or balance issues
Here’s something important that most articles skip. Yeast infections and bacterial infections look nearly identical to the naked eye. The treatments are completely different, and using the wrong one can actually make the infection worse.
Antifungal drops do nothing for bacteria. Antibiotics do nothing for yeast. Your vet takes a microscope sample to tell the difference, which is why guessing at home is a bad idea when there’s an active infection.
How Often Should You Clean?
This one depends entirely on your dog. There’s no universal schedule that works for everyone.
| Dog Type | Cleaning Frequency |
|---|---|
| Floppy-eared breeds | Every 1-2 weeks |
| Upright-eared breeds | Once a month or when visibly dirty |
| After swimming or bathing | Always, regardless of breed |
| Summer months (high humidity) | Increase by 1 extra cleaning per month |
| Dogs with allergies | Follow your vet’s specific schedule |
Here’s the thing most people get wrong though. Over-cleaning is just as harmful as under-cleaning. Your dog’s ear canal has a protective layer of natural wax that’s supposed to be there.
Cleaning too frequently strips that layer and irritates the canal lining, which actually makes infections more likely, not less. Vets have a name for it: cleaning-induced otitis.
The real rule? Check weekly, clean only when needed. Lift the flap, take a look, give it a sniff. If everything looks and smells normal, leave it alone.
Home Remedies That Don’t Actually Work
I see these recommended everywhere online. Most of them range from useless to actively harmful.
Apple cider vinegar. The idea is that it restores the ear’s acidic pH. The reality? Full-strength vinegar (5% acetic acid) burns inflamed tissue. And if the eardrum is ruptured, which you can’t check at home, it enters the middle ear and causes real damage. Not worth the risk.
Coconut oil. It might loosen some surface debris, but oils trap moisture inside the canal. For a body part where moisture is literally the main infection trigger, adding oil is working against yourself.
Olive oil. Same problem as coconut oil. Traps moisture, creates a better environment for yeast growth. Pass.
Diluted hydrogen peroxide. Still irritates the tissue even when diluted. No veterinary source recommends it.
Plain water rinse. Doesn’t dissolve wax, and leaves moisture behind that can’t evaporate from the curved canal.
This is the method I’d go with. Spend the $12 on a proper vet-formulated ear cleaner. It’s pH-balanced, contains surfactants that actually break up wax, includes drying agents that evaporate moisture after your dog shakes, and it won’t burn if the ear is slightly irritated. None of the DIY options do all of that.
Getting Puppies Used to Ear Cleaning Early
If you’ve got a puppy, you have an incredible advantage. Start handling their ears from day one, even if there’s nothing to clean yet.
The goal at this stage isn’t cleaning. It’s association. You want your puppy to grow up thinking that someone touching the inside of their ears is normal and leads to good things.
Start with five to ten short sessions before your first real cleaning. Touch the outside of the ear. Treat. Flip the ear flap. Treat. Touch the inside with your finger. Treat. Work your way up gradually over a few days until you can mimic the full cleaning process without the puppy pulling away.
Keep early sessions under two minutes. Do them before meals when your puppy is hungry and treats land harder. Use a reward they never get at any other time.
Also keep an eye out for ear mites during puppyhood. They’re more common in young dogs than adults. The telltale sign is dark, coffee-ground-like debris inside the ear paired with intense scratching.
I’m a passionate dog lover, but I’m not a certified veterinarian. If your dog shows signs of an ear infection or you’re unsure about what you’re seeing, always consult your vet before treating at home.
Here’s to happy, healthy ears!